In the virtual influencer and AI model niche, brand recognition is everything. To run social media profiles and monetize via Fanvue subscriptions, your digital model must maintain the exact same face and body proportions across every photo and short video.
Relying solely on text prompts will cause the AI to output a completely different person in every generation. To lock in facial features and physique, you need to compile an image dataset and train a dedicated custom model—a LoRA.
In this guide, we break down the end-to-end process of creating an AI model in 2026: from preparing raw source images and training a LoRA to running generation workflows in ComfyUI using RunPod cloud servers.
What Is a LoRA and Why You Need One
Base AI models (like Flux.1 or SDXL) produce realistic human images, but generate a random face with every request. Even if you meticulously detail hair color, nose shape, or height, getting the same person across two separate renders is nearly impossible.
LoRA solves this problem. It is a lightweight adapter file trained on 35–40 photos of a specific person and attached directly to the base AI model. During training, the LoRA captures exact facial traits, eye shape, cheekbone structure, and body proportions.
The output is a single compiled file with a .safetensors extension (ranging from 50 MB to 1.5 GB in size).
The operational workflow for a LoRA consists of three steps:
-
Load the .safetensors file into your generation software (such as ComfyUI or an online service like Civitai).
-
Include a trigger word in your text prompt. This unique keyword (e.g., model_girl or kate_woman) is defined during training and signals the AI to pull features from your loaded LoRA file.
-
Specify only the pose, clothing, and environment in the rest of your prompt (e.g., model_girl in a red dress walking down a street in Tokyo). The neural network extracts the face from the LoRA file and generates the scene with your exact model.
Dataset Preparation: Step-by-Step Collection
LoRA quality depends directly on the training images you feed it. Blurry photos or images featuring varied body types will cause the AI to render inconsistent faces and visual artifacts.
To achieve stable outputs, prepare 35–40 sharp images of a single model. Generating this many identical shots of a non-existent person through standard prompting is impractical, so datasets are built by combining a face reference and a body donor.
Step 1. Sourcing Base Assets
-
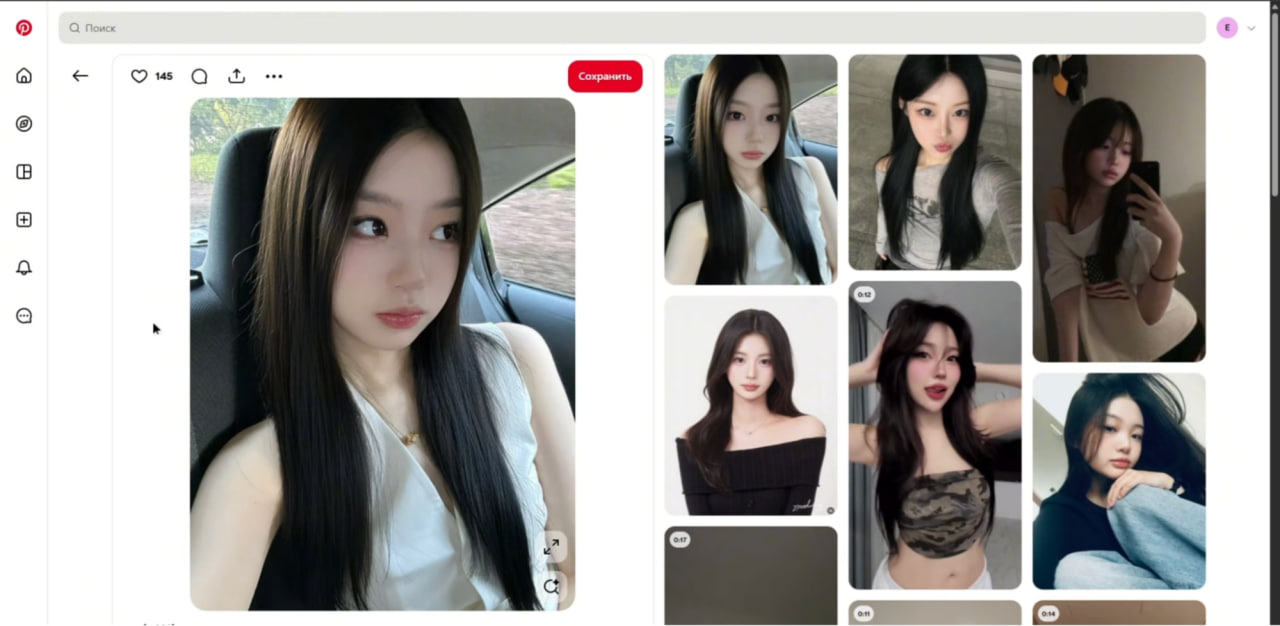
Face: Find a high-resolution photo on Pinterest featuring sharp facial features under clear daylight. This face serves as your model's permanent appearance.
-
Body: Locate an Instagram profile of a real influencer containing 30–40 photos. The primary requirement is consistent body proportions and physique across all shots.
Step 2. Swapping the Face onto the Body To generate 35–40 dataset frames of your future model in diverse poses and settings, swap the Pinterest face onto the Instagram donor photos:
-
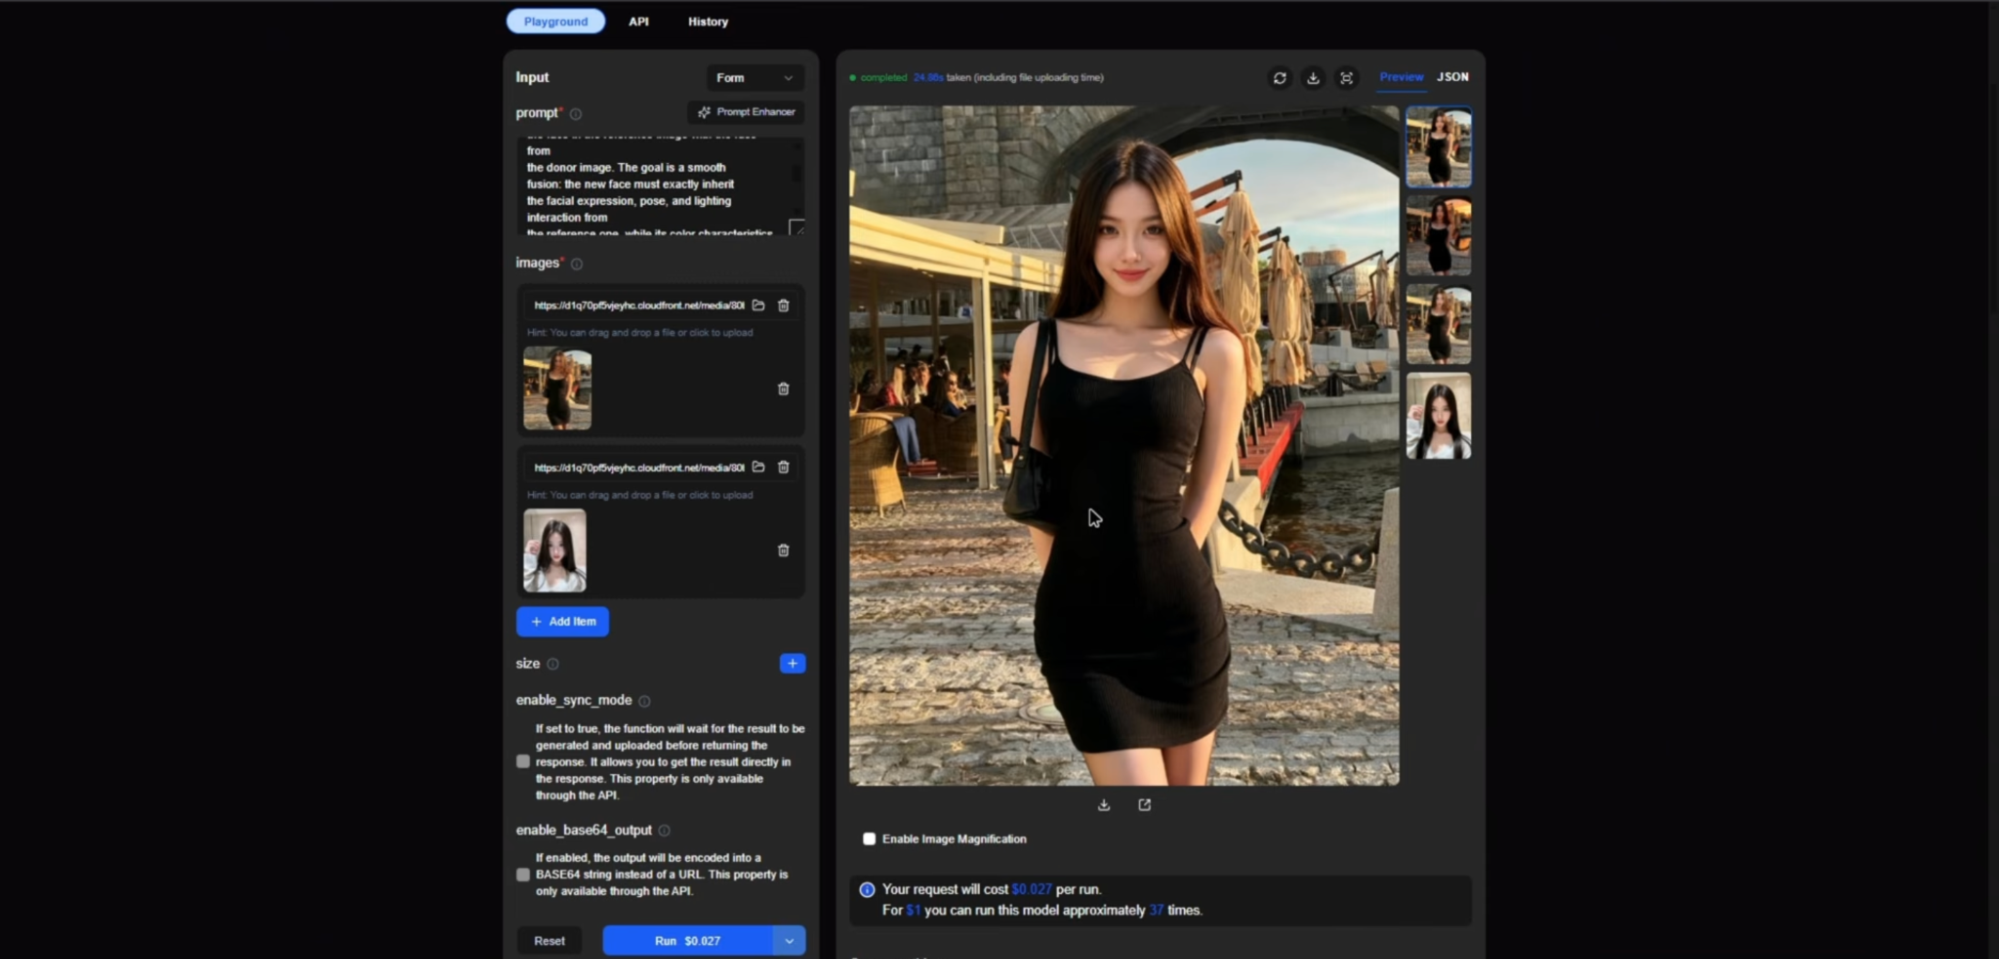
Open a face-swap platform (e.g., WaveSpeed utilizing the Dream V4 Edit model).
-
Upload your target face photo into the first slot and the body donor photo into the second slot.
-
Enter an English prompt instructing the system to apply the face from image 1 onto the body, pose, and outfit from image 2.
«photo of the woman from image 1 with the exact body, pose and outfit from image 2, natural skin texture, realistic lighting, 8k, high quality, raw photo».
-
Repeat this swap across all 30–40 donor images and download the output files.
Step 3. Image Selection Select 35 to 40 clean renders for your training folder:
-
20–25 Portraits: Close-up and medium shots covering various angles (front-facing, three-quarter, profile), lighting conditions, and expressions.
-
15–20 Full-Body Shots: Full-length poses in casual wear, swimwear, or lingerie, allowing the model to learn proper physical proportions.
Exclude fully explicit shots from your core training dataset. Nude images during base LoRA training blur facial definition and yield plastic skin textures. Train base LoRAs on portraits and swimwear, then handle explicit variations separately during post-processing.
Step 4. Captions and Text Descriptions. The AI must distinguish between your model and secondary elements like backgrounds, clothing, and lighting. Without descriptive text captions, the system will assume background details or dress colors are permanent features of your model.
To separate subject features from environment:
-
Create a matching text file for every image (e.g., 1.txt for 1.jpeg, 2.txt for 2.jpeg).
-
Inside each text file, briefly describe the pose, clothing, camera angle, and setting.
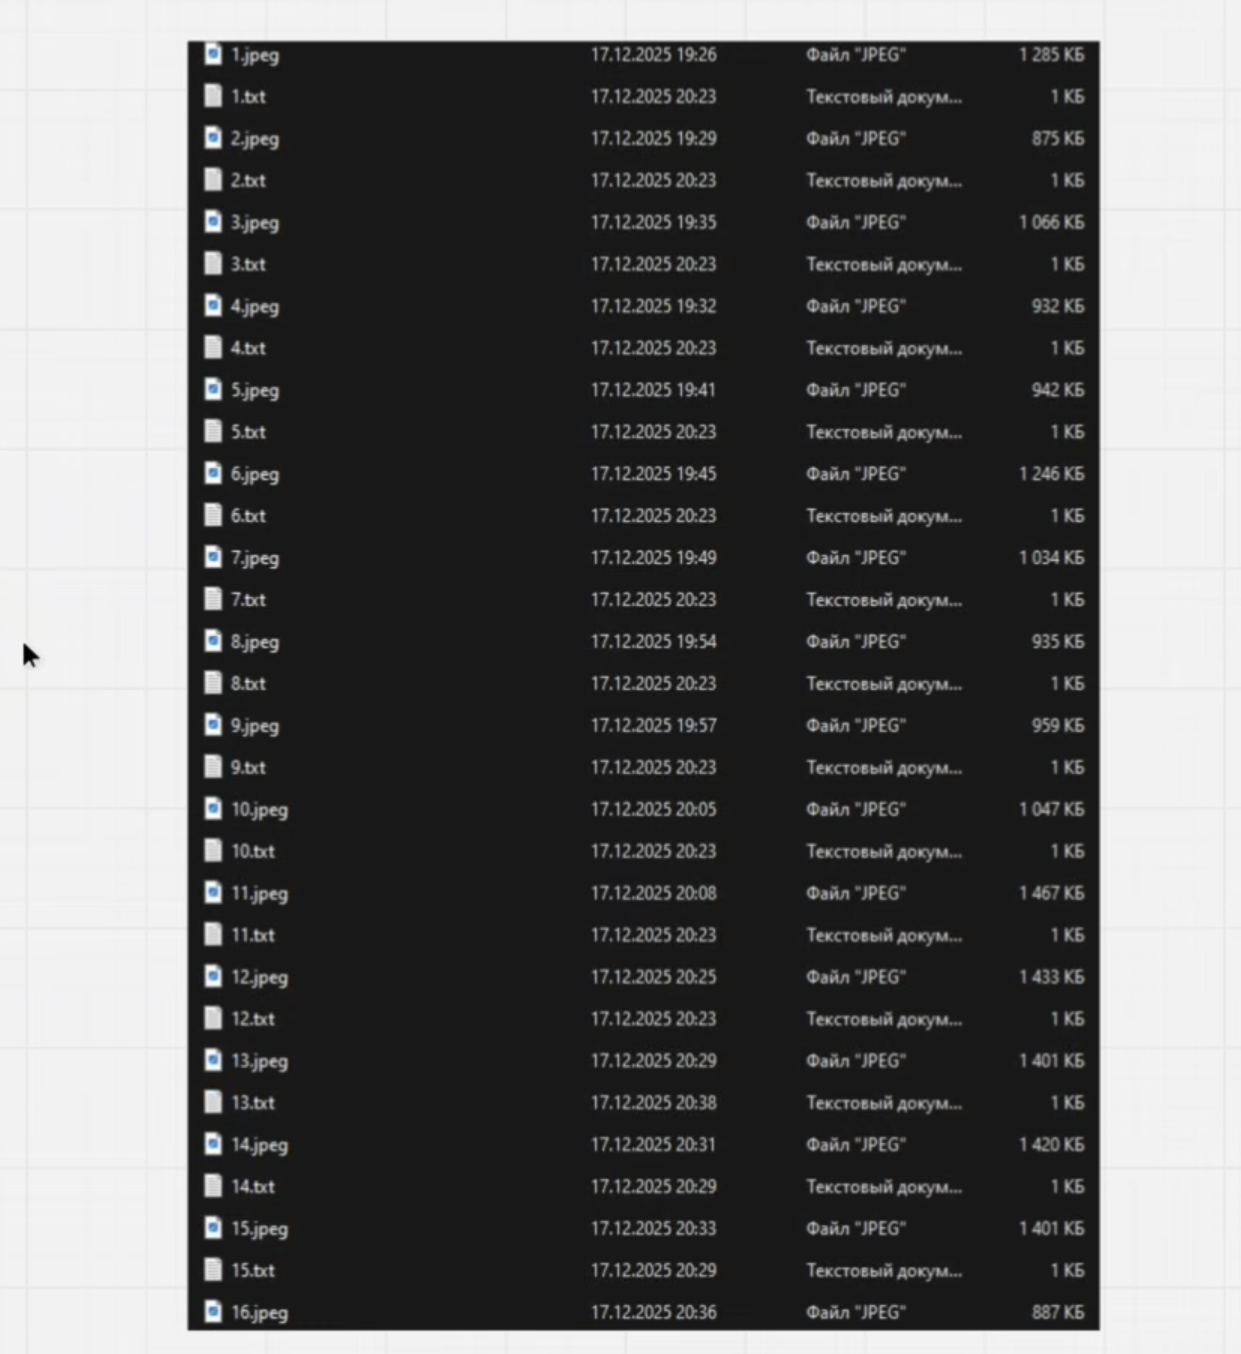
Example content for 1.txt:
«a young woman sitting at a wooden table in a cafe, wearing a white oversized shirt, holding a coffee cup, daylight from the window, cinematic lighting, realistic photo».
Do not describe permanent facial features, hair color, or eye color. If you write blonde hair, blue eyes inside caption files, the neural network bakes blonde hair into the model's core profile. Consequently, altering hair color or makeup via prompts later on will no longer work.
Step 5. Compiling the Archive Bundle all image and text file pairs into a single directory and compress them into a .zip archive. This file will be uploaded directly to the training service.
Understanding Base Models
A LoRA cannot function independently; it is an add-on file trained specifically for a base checkpoint model (the core image engine).
Base models act as the primary engine that generates humans, clothes, lighting, and environments from scratch. The LoRA simply informs that engine which facial structure and body proportions to draw.
In 2026, three main engines dominate AI model creation:
-
Flux.1. The leading engine for photorealism. It excels at rendering skin textures, pores, fine hair, and accurately interpreting complex English prompts.
-
SDXL (Stable Diffusion XL). A lighter architecture. While slightly less detailed, it features the largest library of custom extensions and post-processing tools.
-
Z-Image. Optimized for ultra-sharp studio portraits with crisp facial definition.
LoRAs trained on Z-Image or Flux are incompatible with SDXL. Loading a LoRA onto an unsupported base engine results in errors or randomized faces.
Step-by-Step LoRA Training
Training a LoRA for Z-Image can be executed using the WaveSpeed AI cloud platform, which provides no-code training modules.
Step 1. Accessing the Training Hub
-
Log into WaveSpeed AI.
-
Navigate to the Model Directory (Explore / Models) or open the Training Tools section.
-
Search for Z-Image LoRA Trainer (or enter z-trainer) and open the tool page.
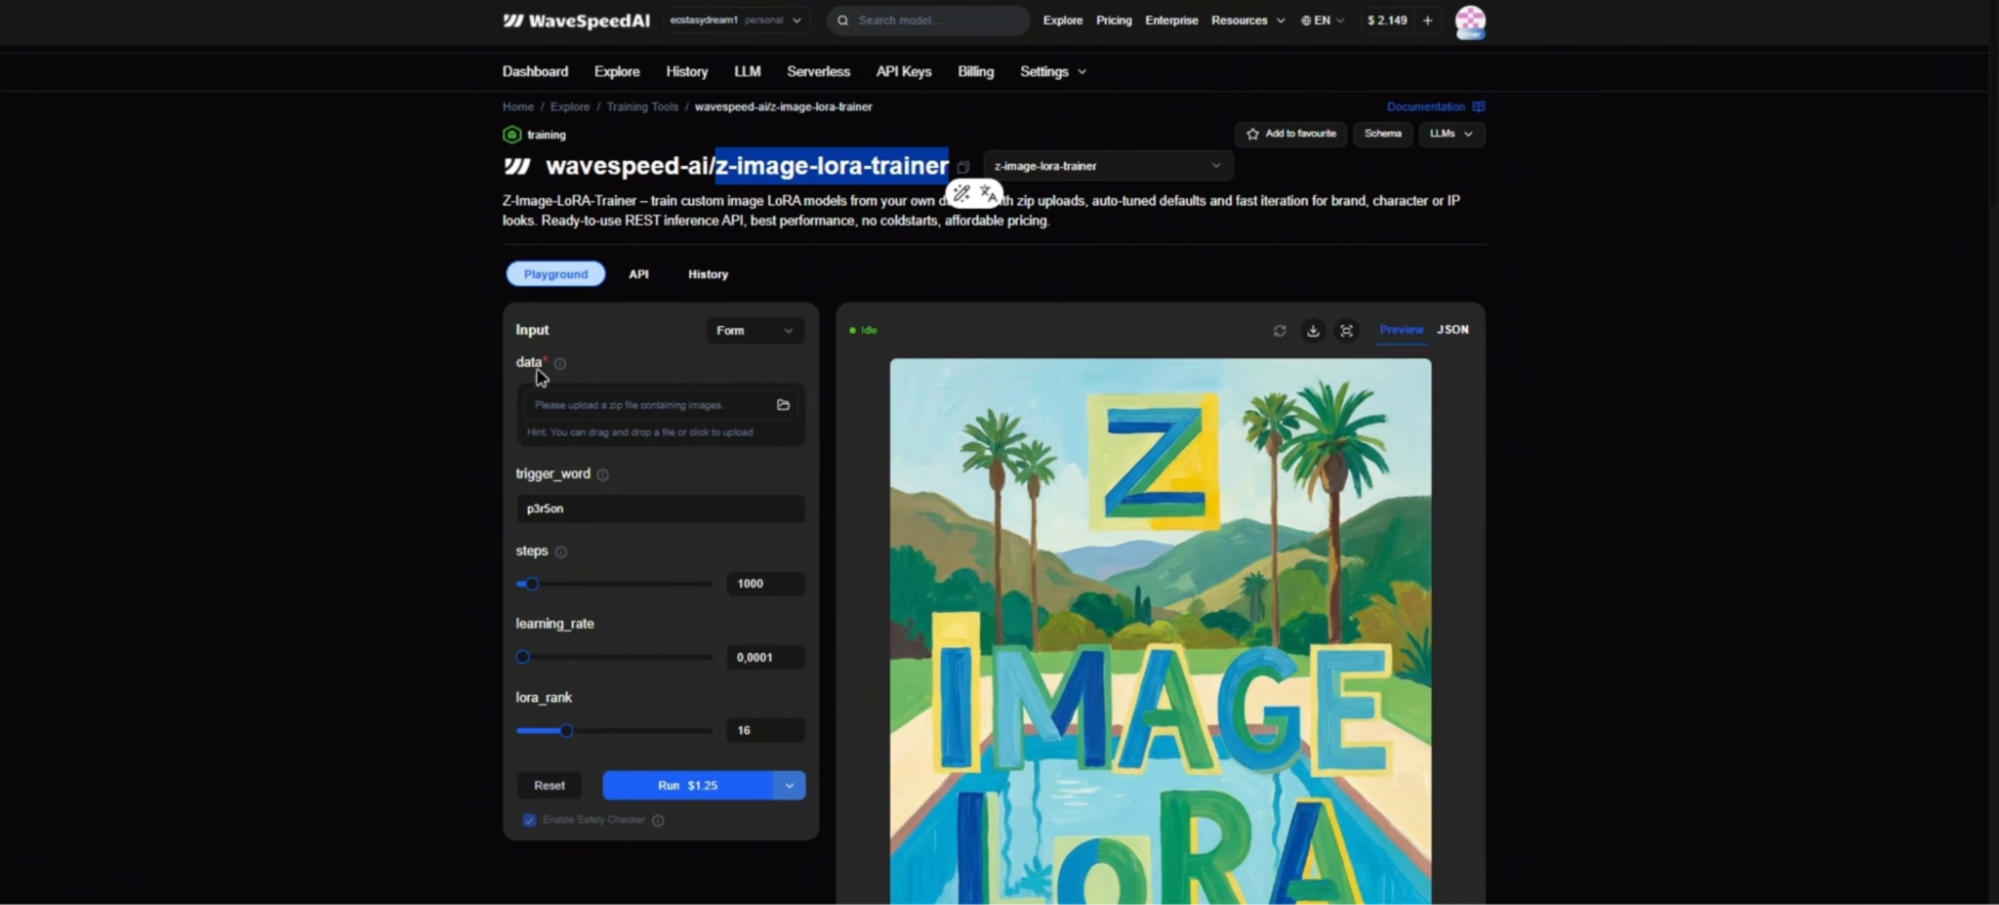
Step 2. Dataset Upload and Configuration Set up your training session:
-
Upload Dataset: Drag and drop your compiled .zip archive containing photos and captions into the dataset field.
-
Trigger Word: Enter your unique identifier keyword (e.g., world or kate_face). This word calls your trained subject during generation.
-
Steps: Set training iterations to 3000. This step count allows the network to learn facial structure and body proportions without overbaking or causing skin discoloration.
Leave default settings unchanged for remaining technical parameters.
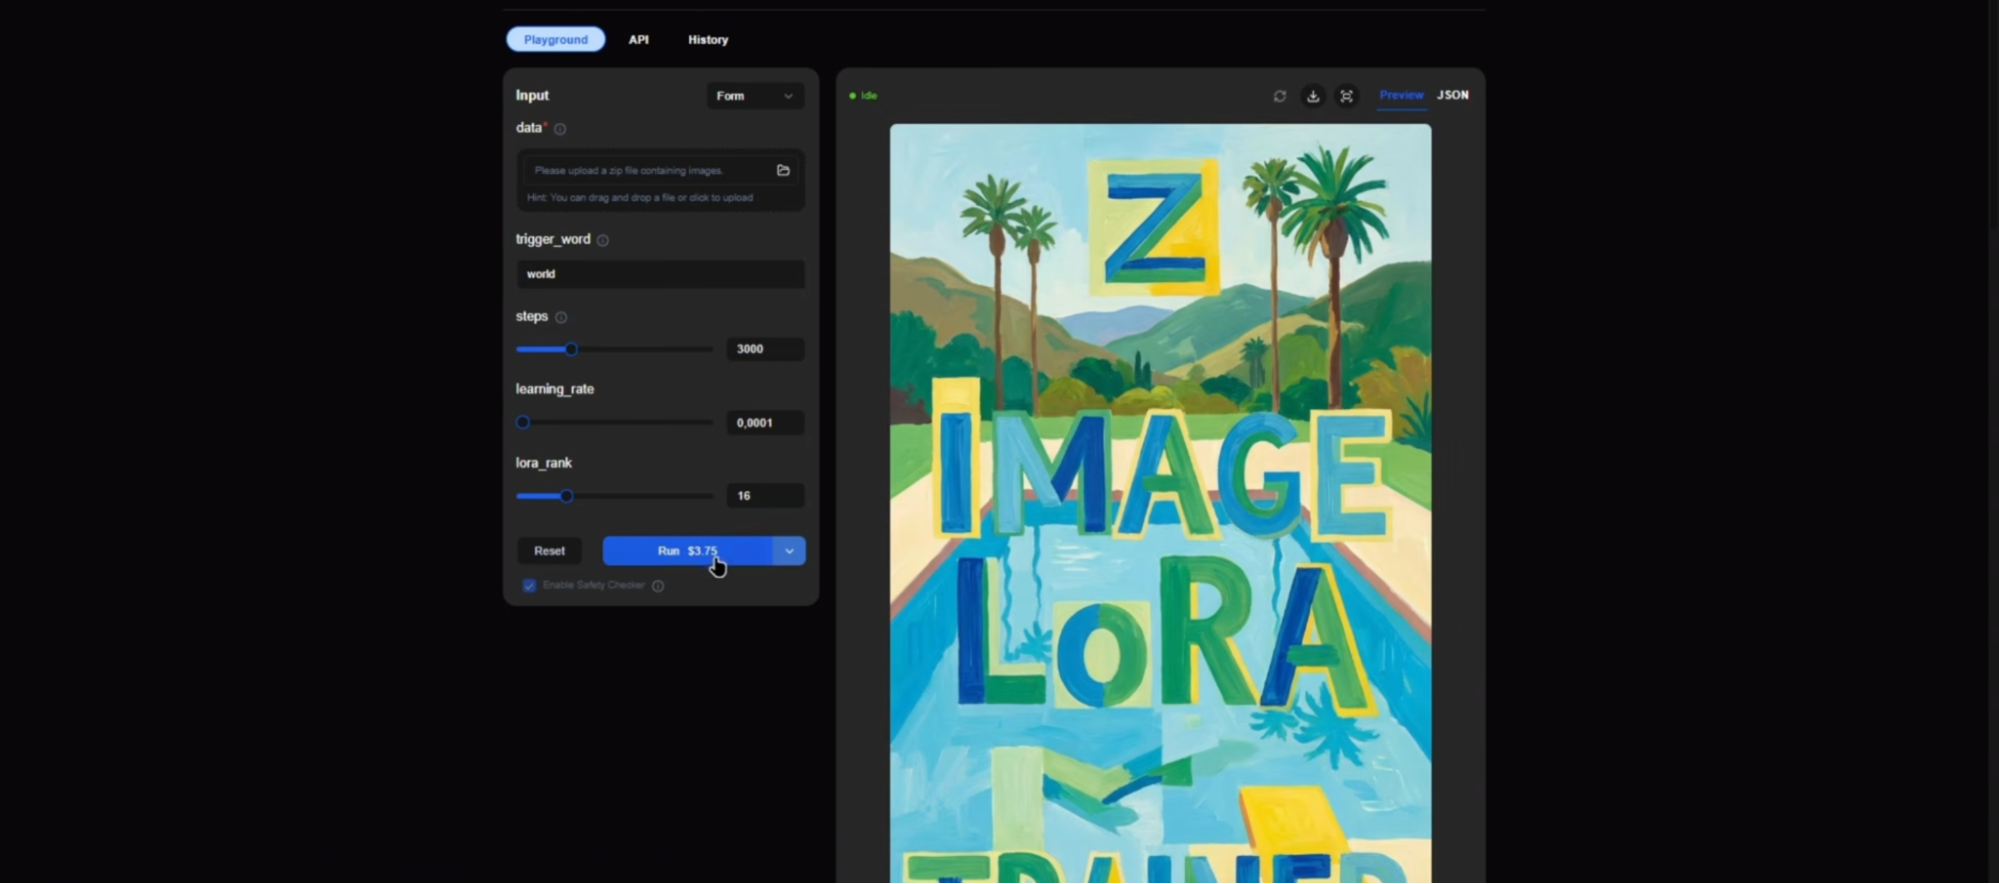
Step 3. Execution and Model Download
-
Click Run at the bottom of the page.
-
Wait for training to complete. The system will compile your LoRA into a .safetensors file.
-
Download the compiled .safetensors file to your local computer.
This file contains your model's facial parameters. Next, link it to ComfyUI on a cloud server to generate photos and video clips.
Deploying ComfyUI on RunPod & Generating Content
Generating high-resolution AI renders and video requires a GPU with at least 16 GB to 24 GB of VRAM, making local consumer laptops inadequate.
To bypass hardware constraints, creators lease cloud GPU servers via RunPod. A starting balance of $15 to $20 provides roughly a month of active computing power.
Step 1. Creating Persistent Storage
Before launching a instance, set up persistent storage volume for base checkpoints, LoRA files, and ComfyUI installations. Without network storage, server resets wipe unmapped files.
-
Register on RunPod and top up your account balance.
-
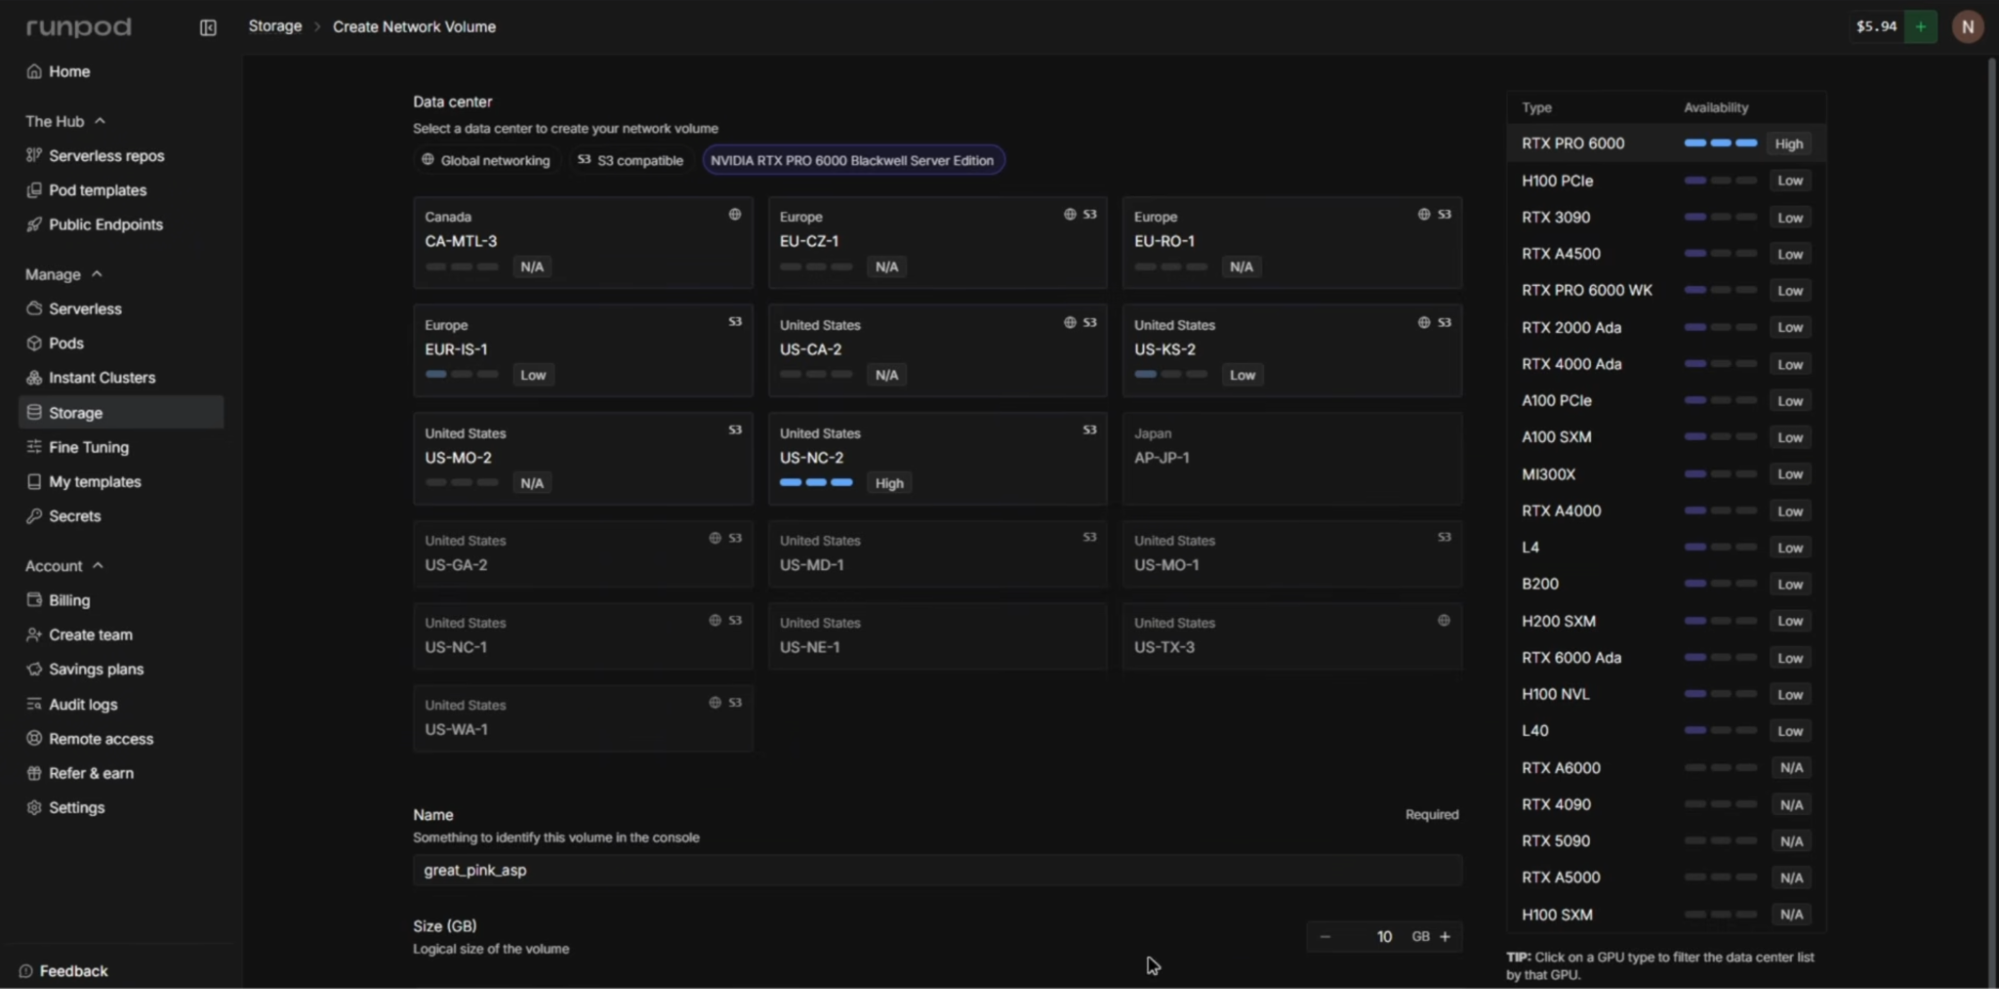
Open the Storage tab in the left sidebar and click New Network Volume.
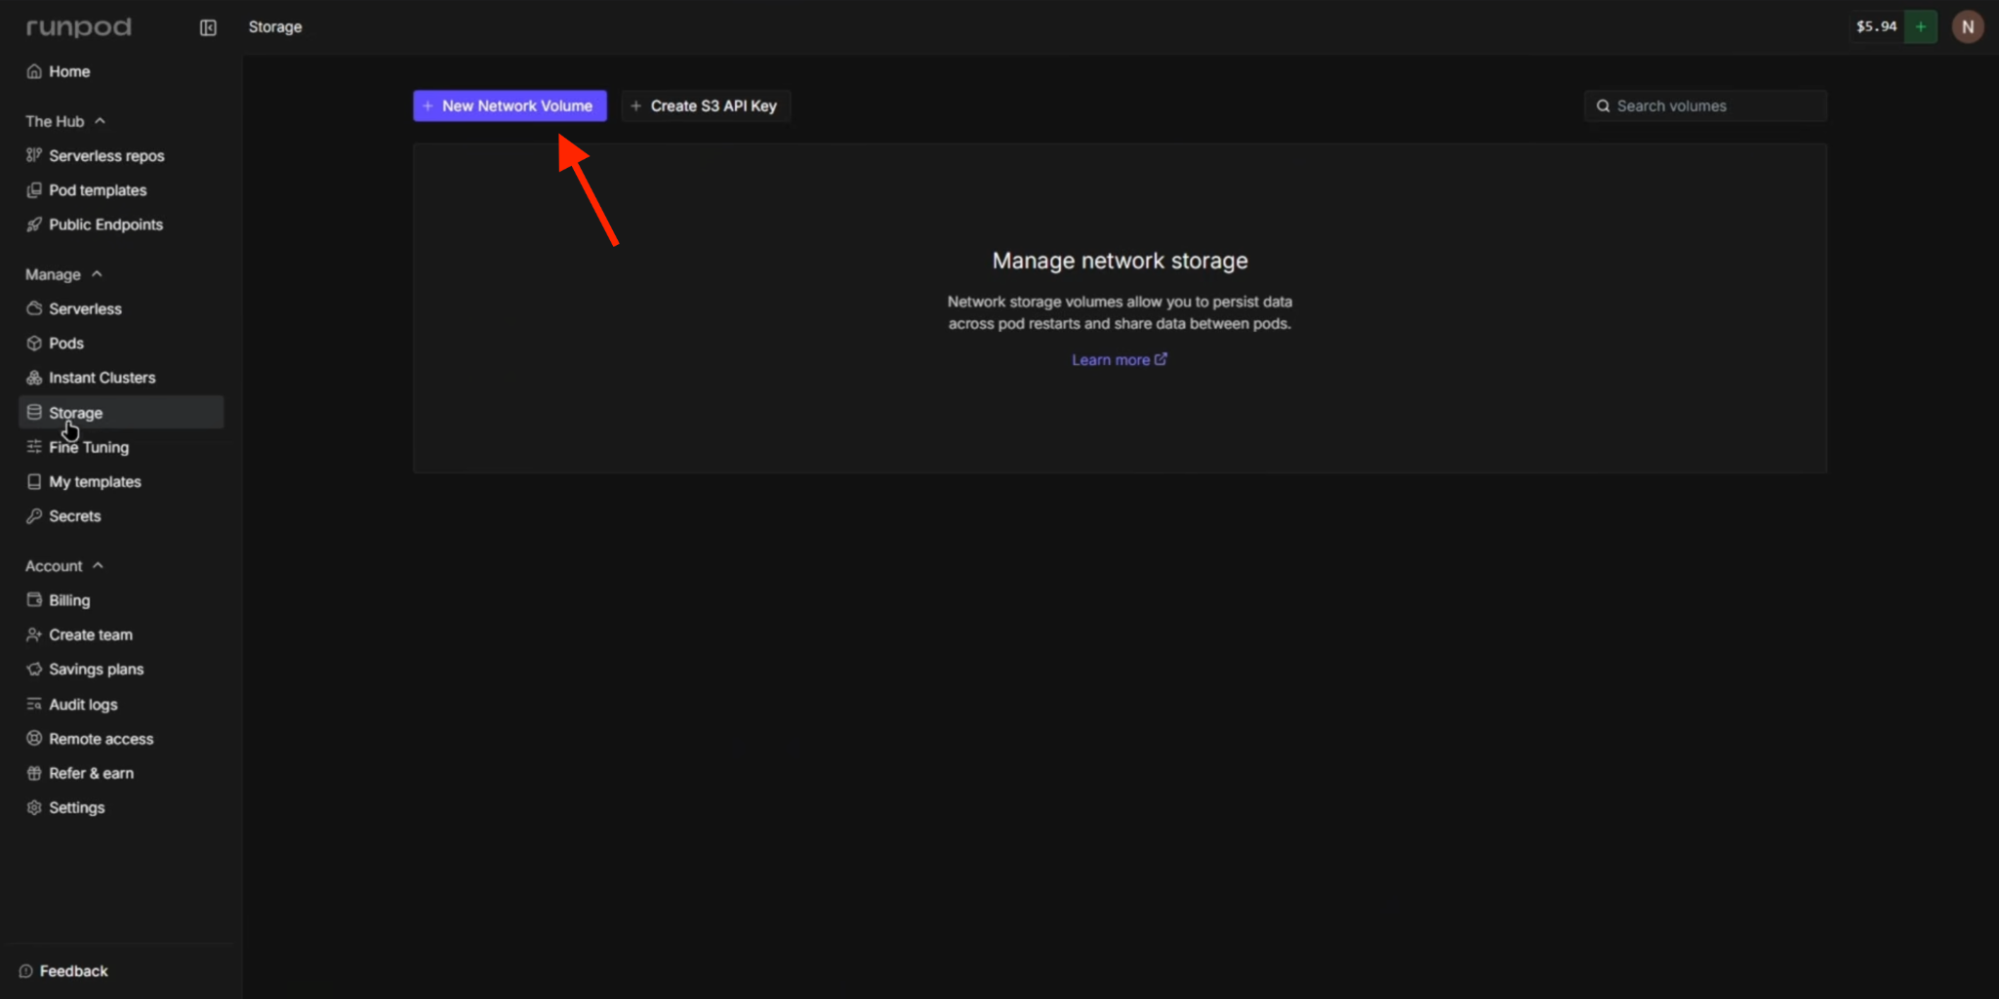
-
Configure disk properties:
-
Size: Allocate 300 GB to accommodate base checkpoints, video generation models, and LoRA files.
-
GPU Type: Map storage to the RTX Pro 6000 or A100 GPU tiers.
-
Data Center: Select a region flagged with High Availability.
-
Click Create Volume to initialize storage.
Step 2. Launching the Instance (Configure Pod)
Deploy your operational server using the initialized network volume:
-
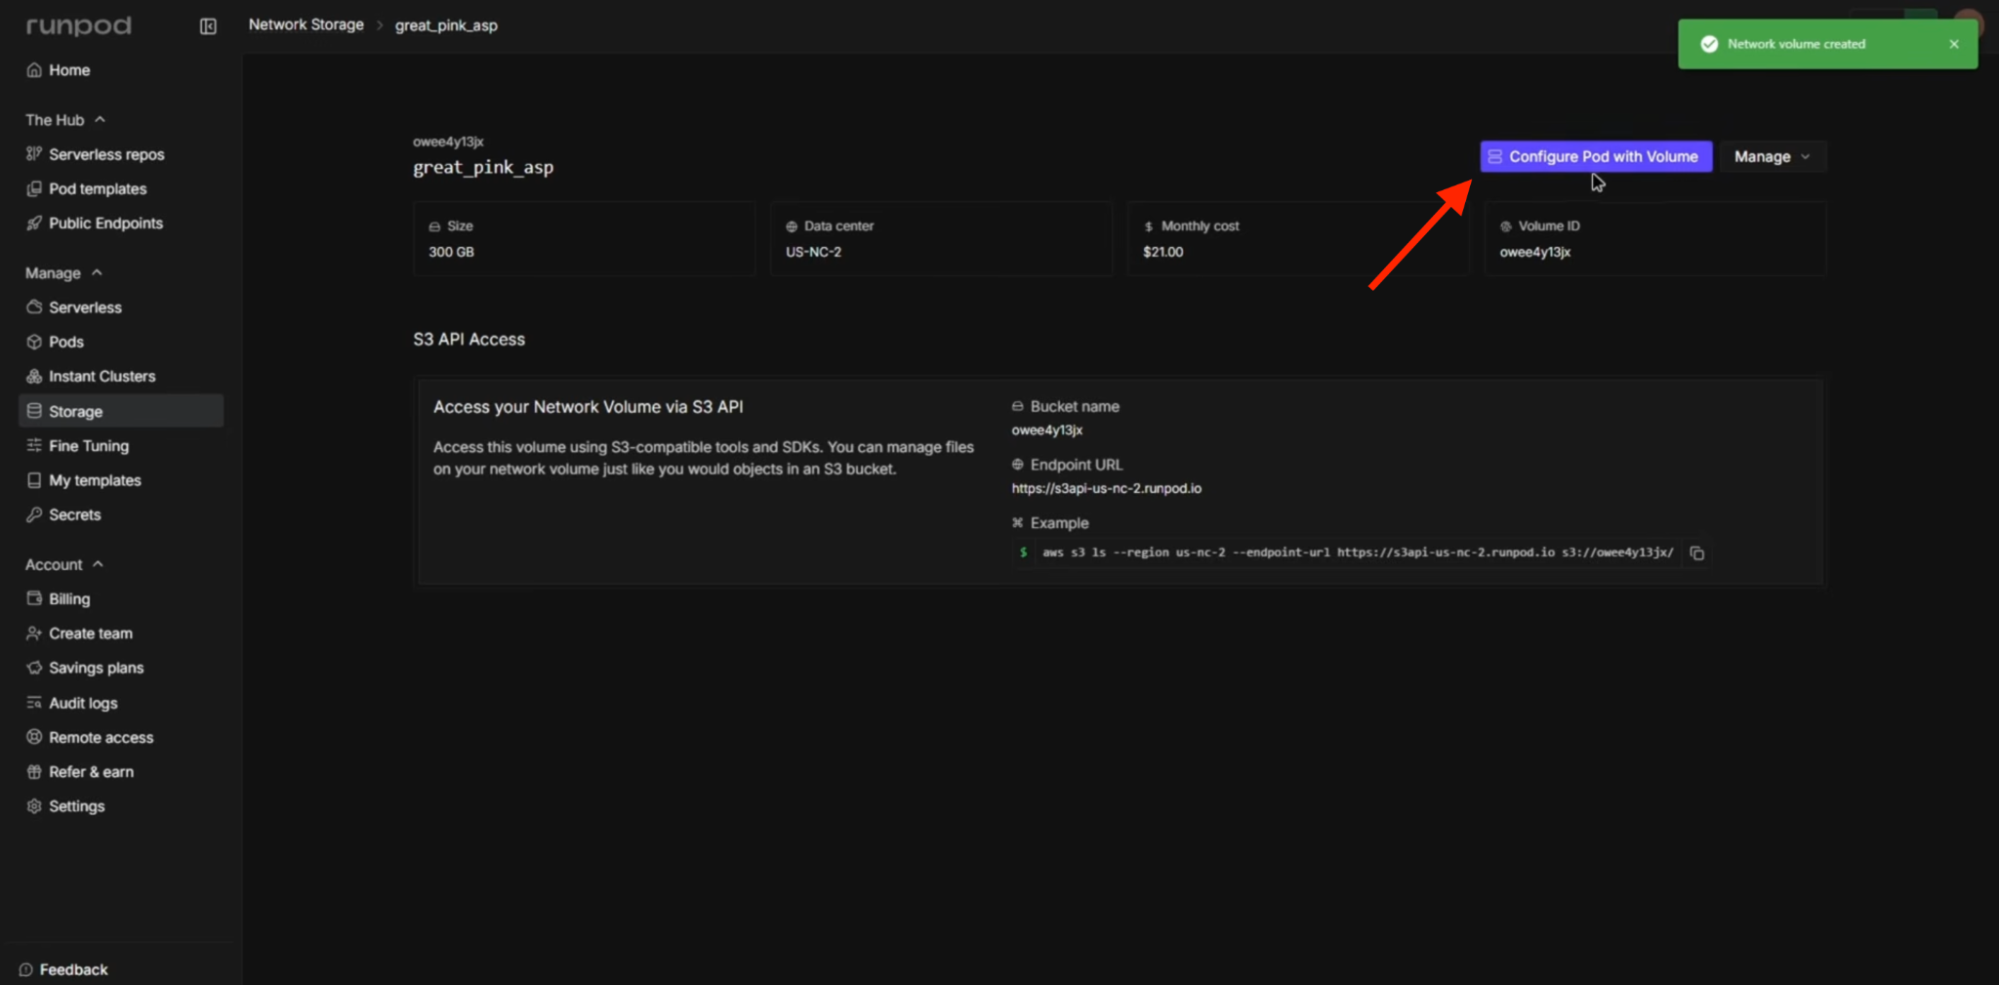
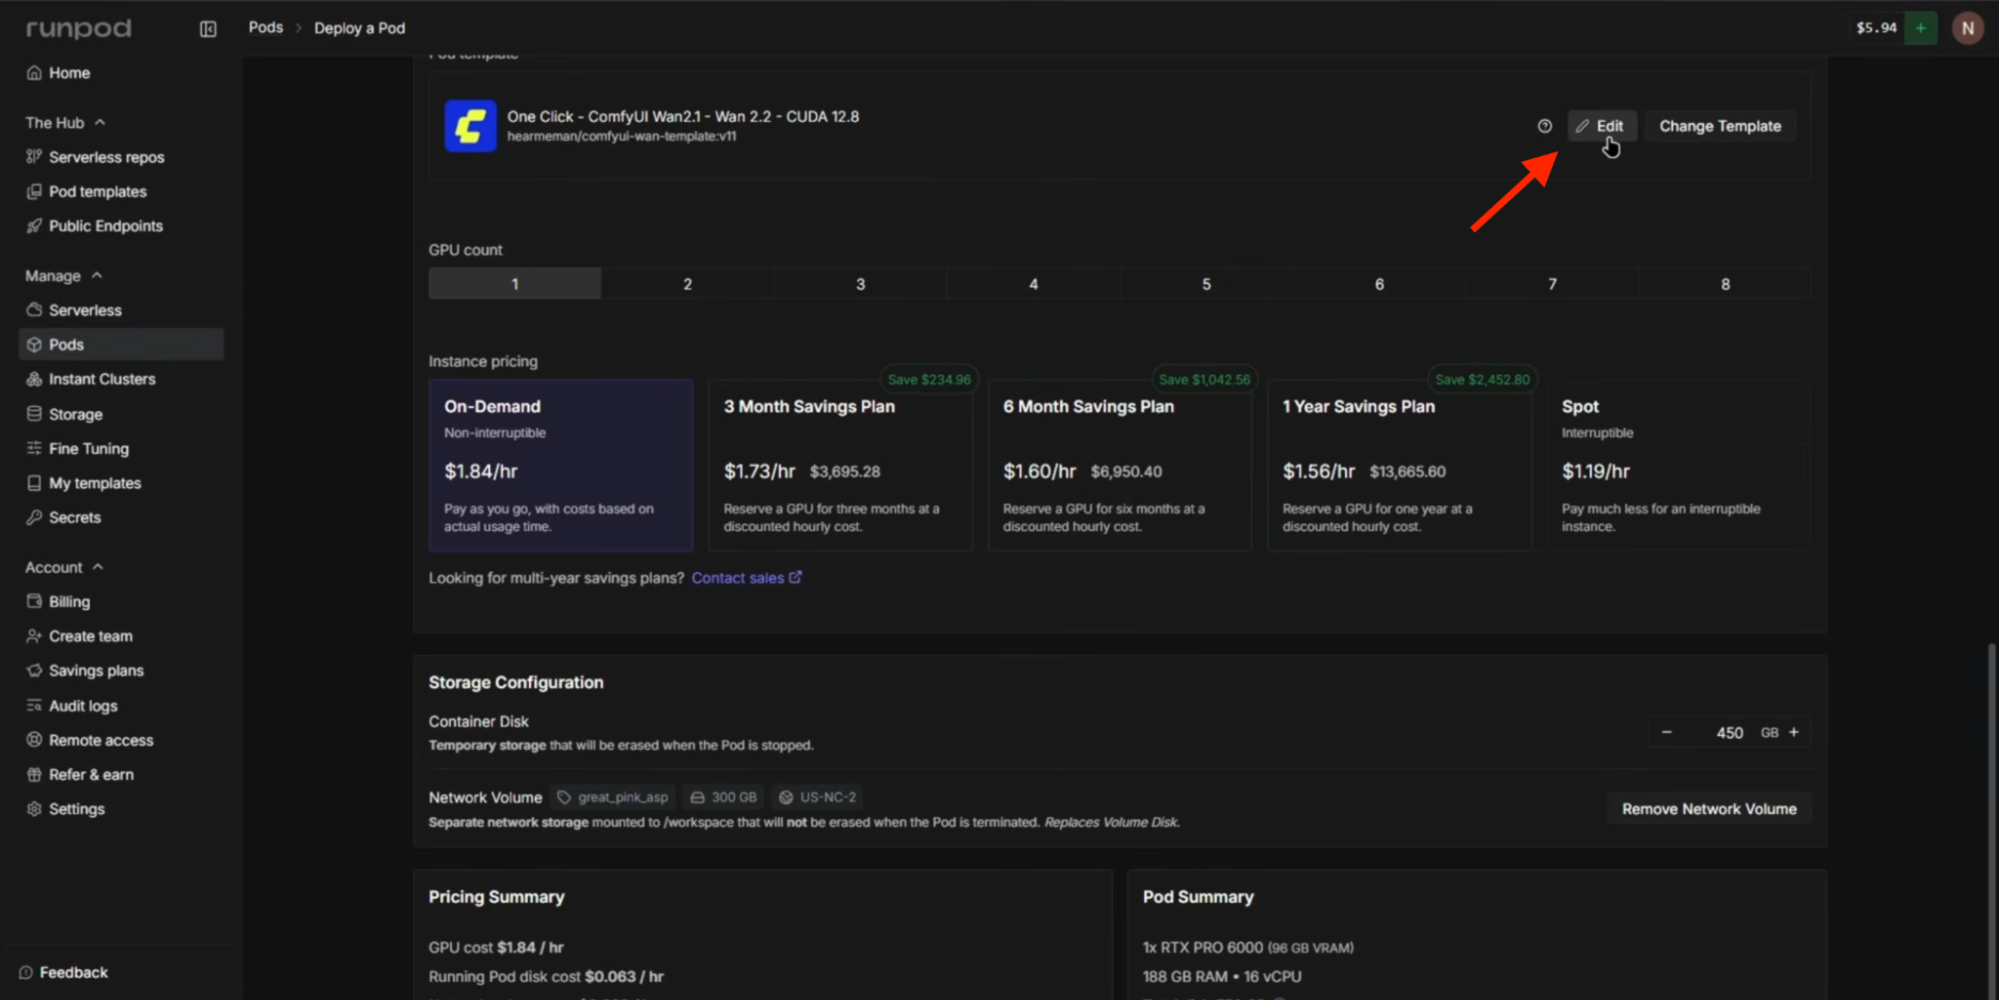
On your storage card, click Configure Pod.
-
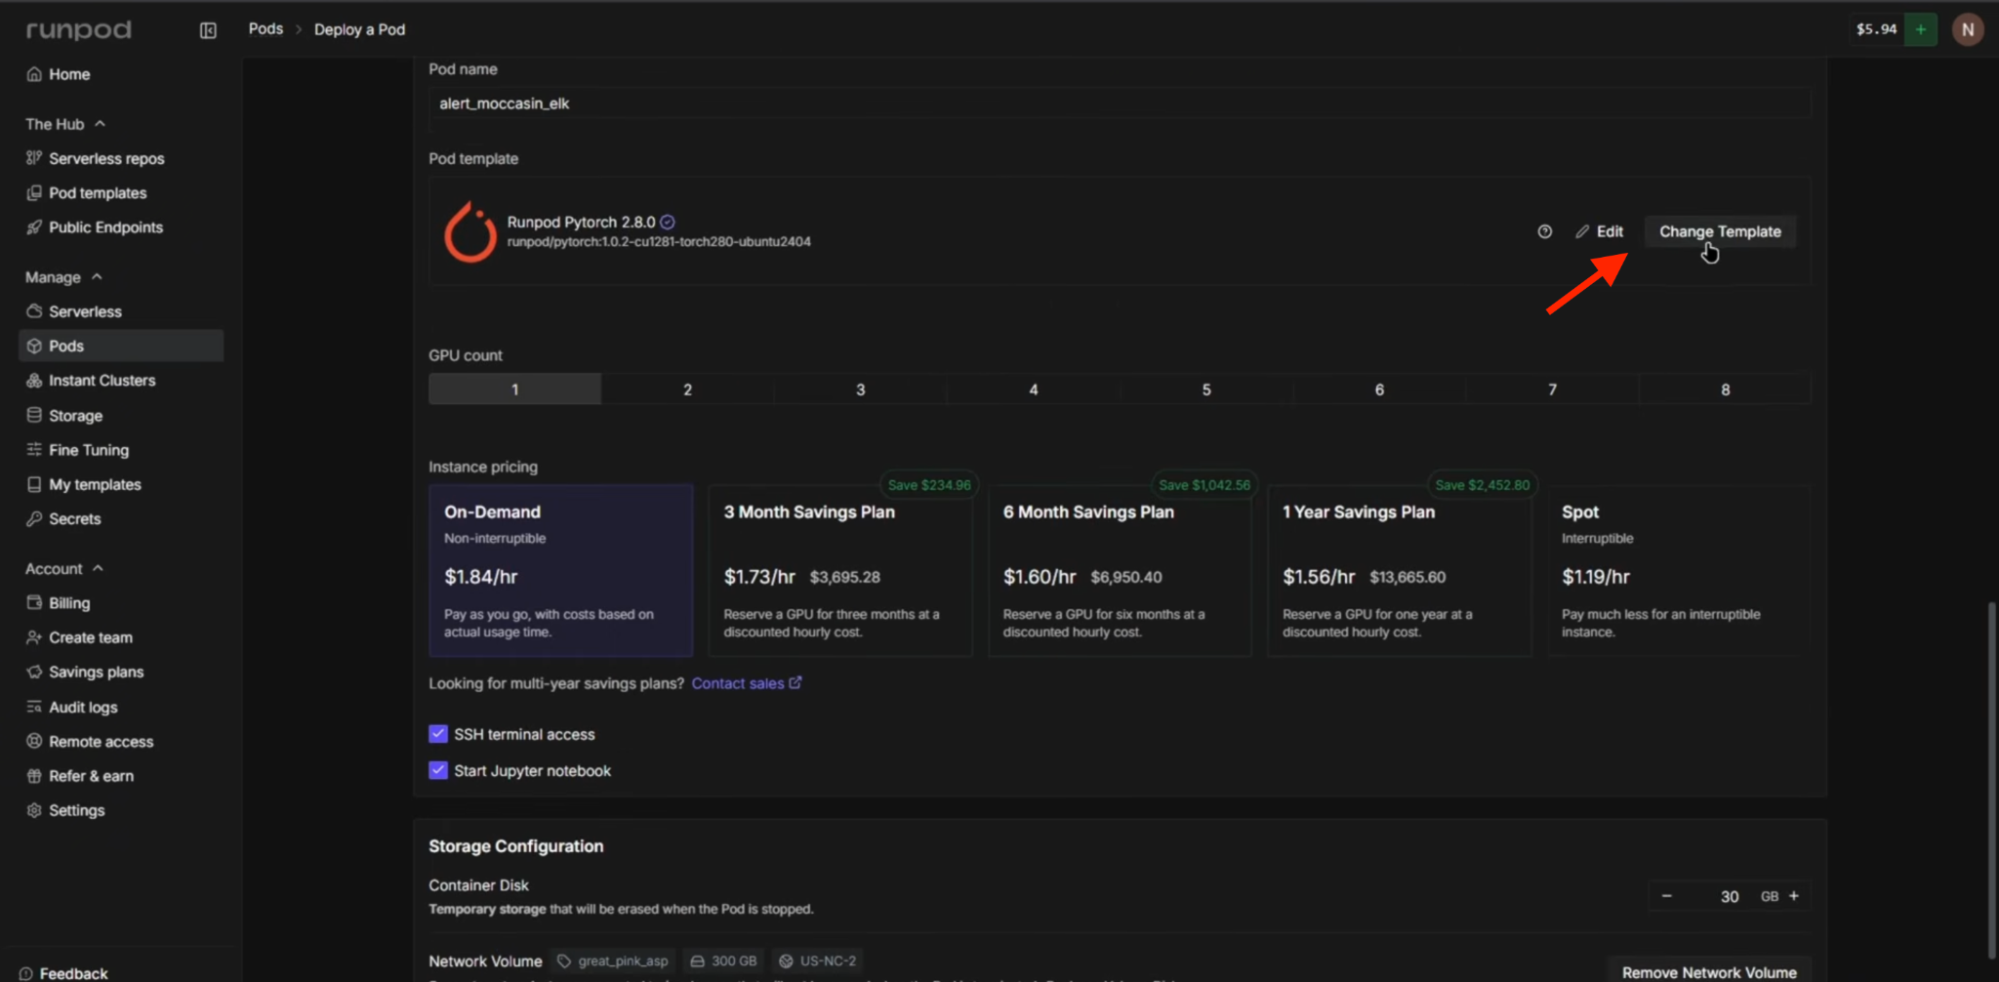
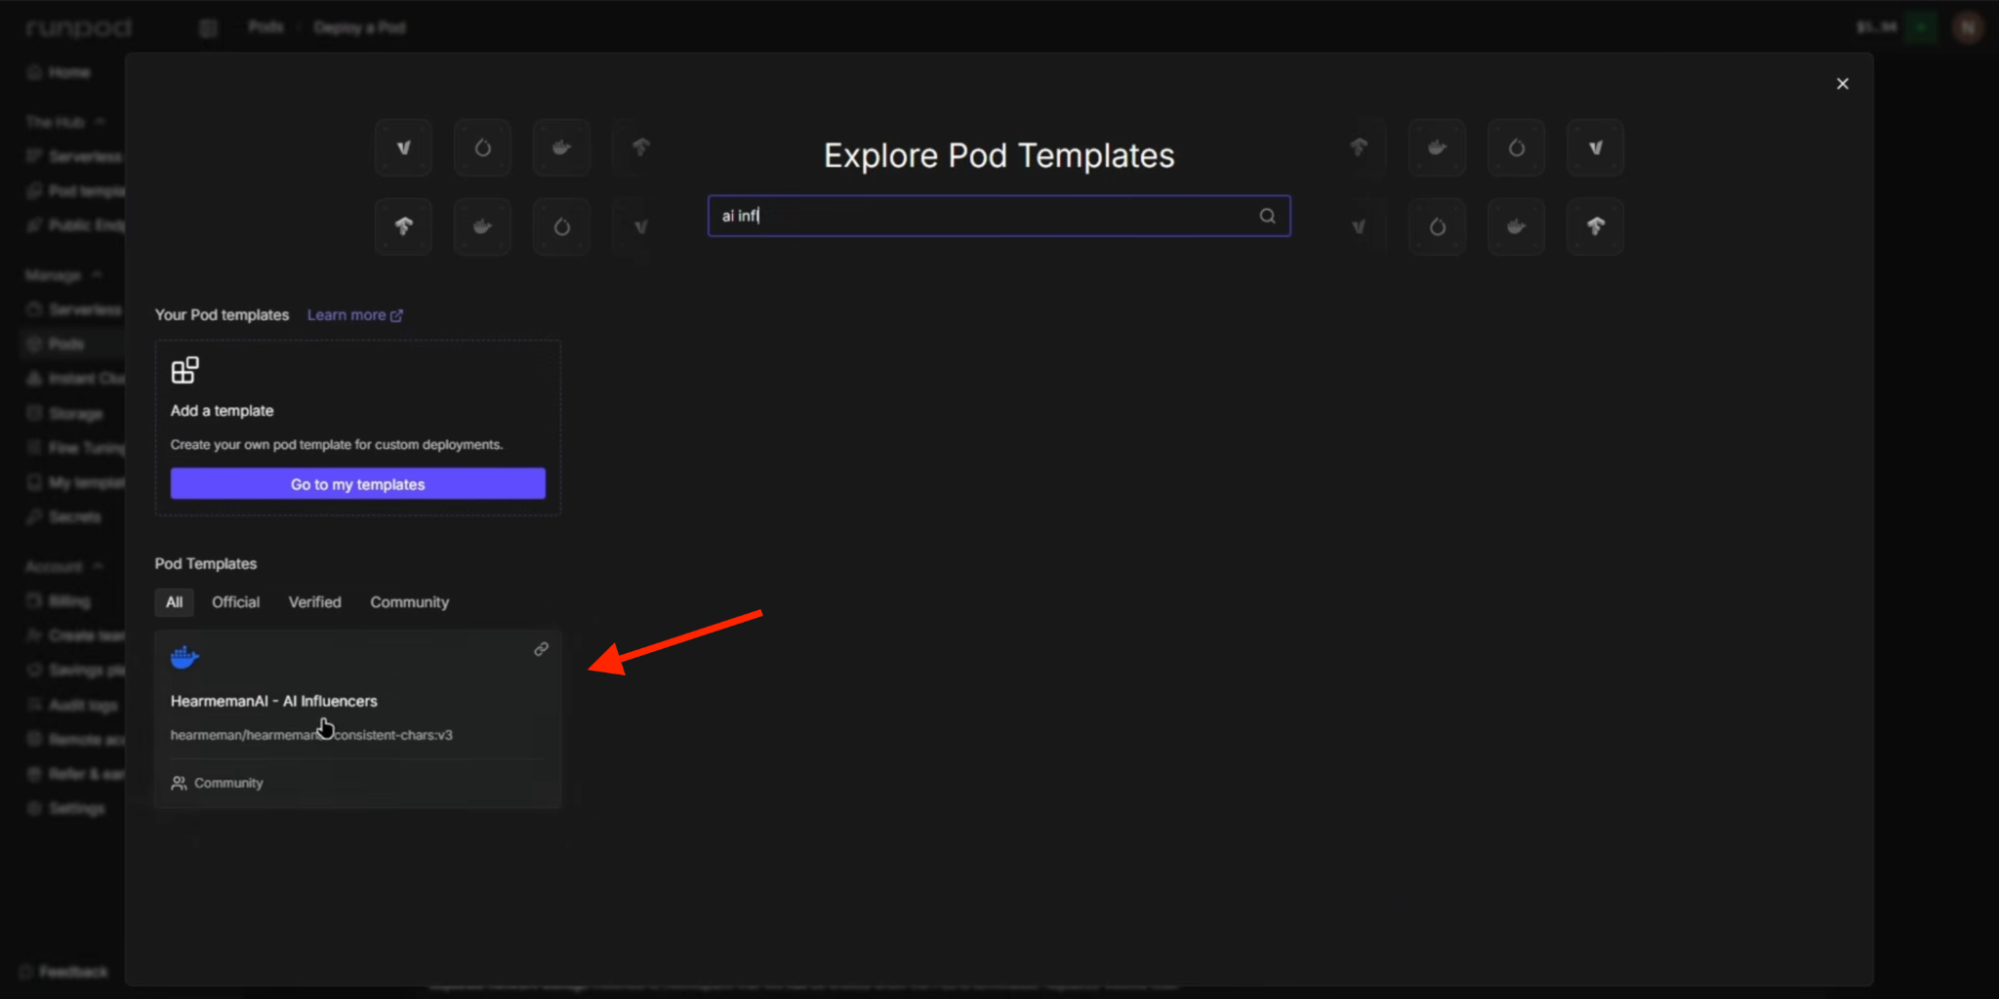
Select a pre-built ComfyUI environment from template library, such as AI Influencers or Wan 2.1 / Wan 2.2 One-Click V11.
-
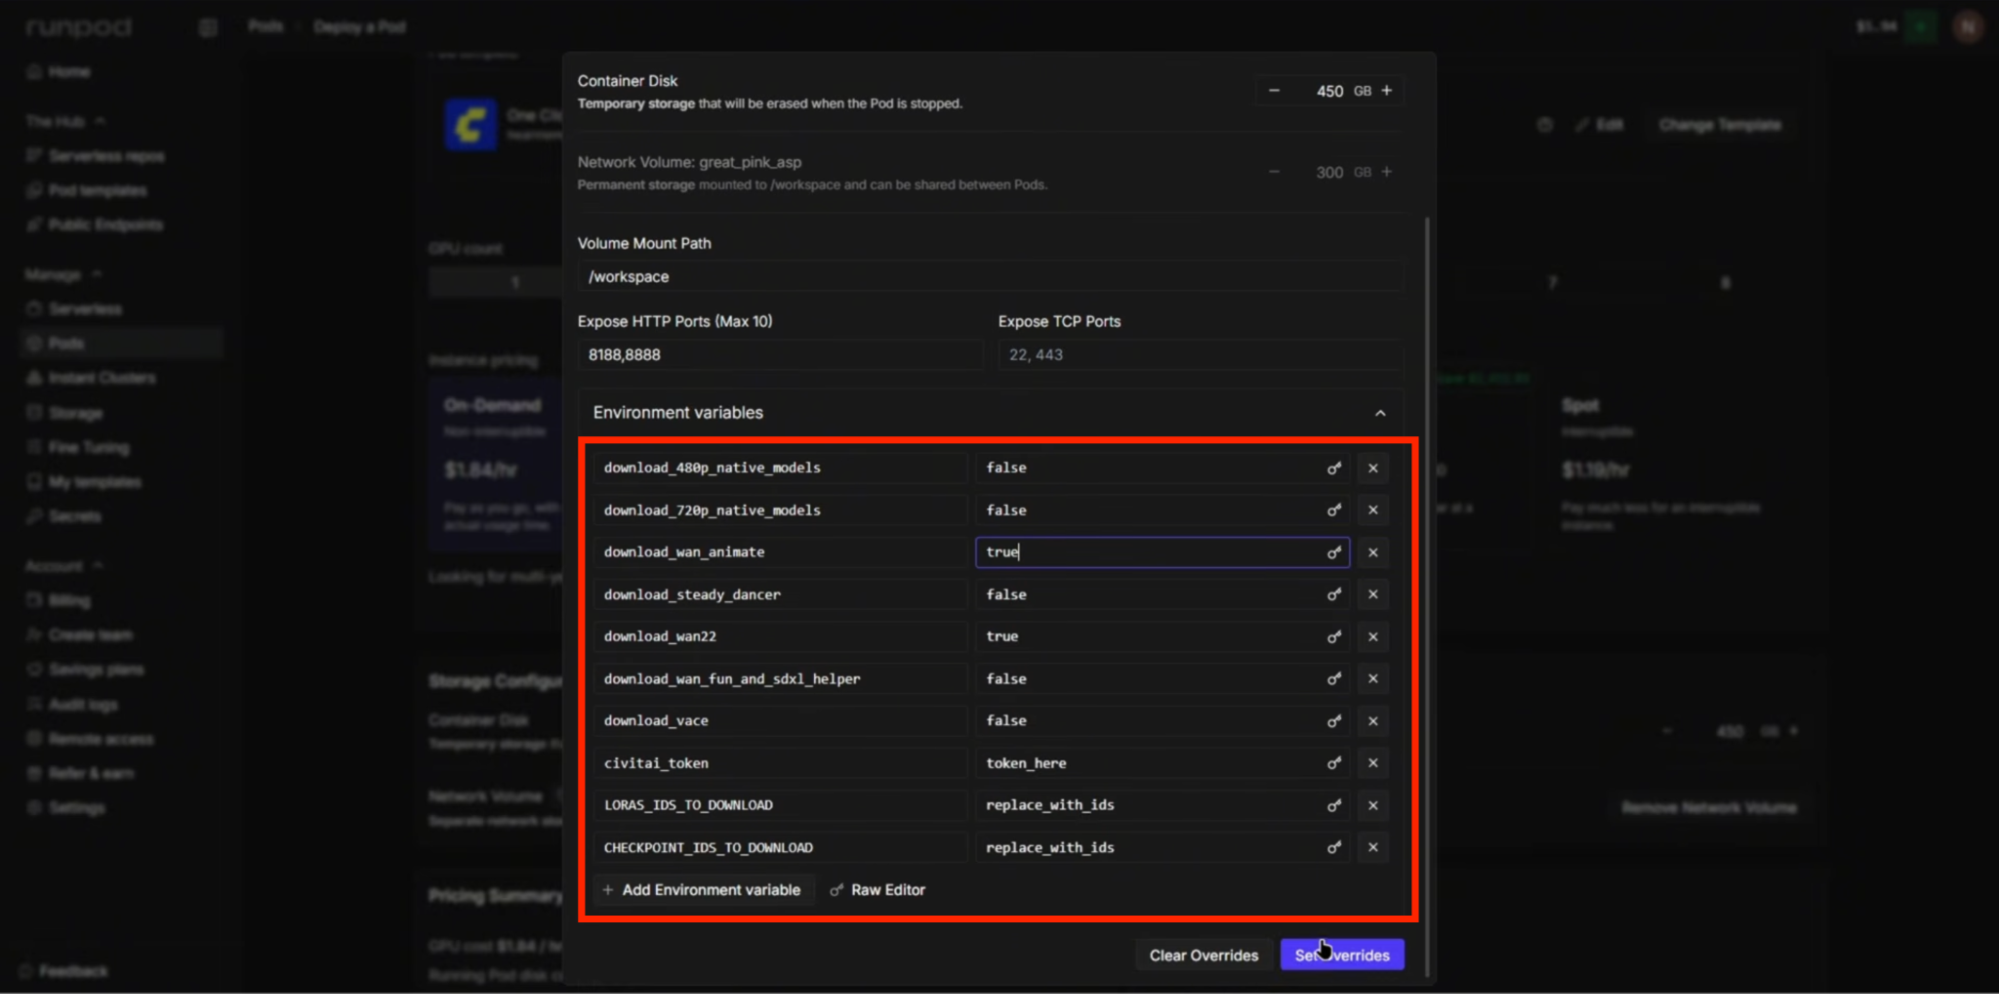
Click Edit Template and open the Environment Variables tab.
-
Set parameters to auto-fetch video weights:
-
download_wan2_2: set value to true.
-
wan_animate: set value to true.
-
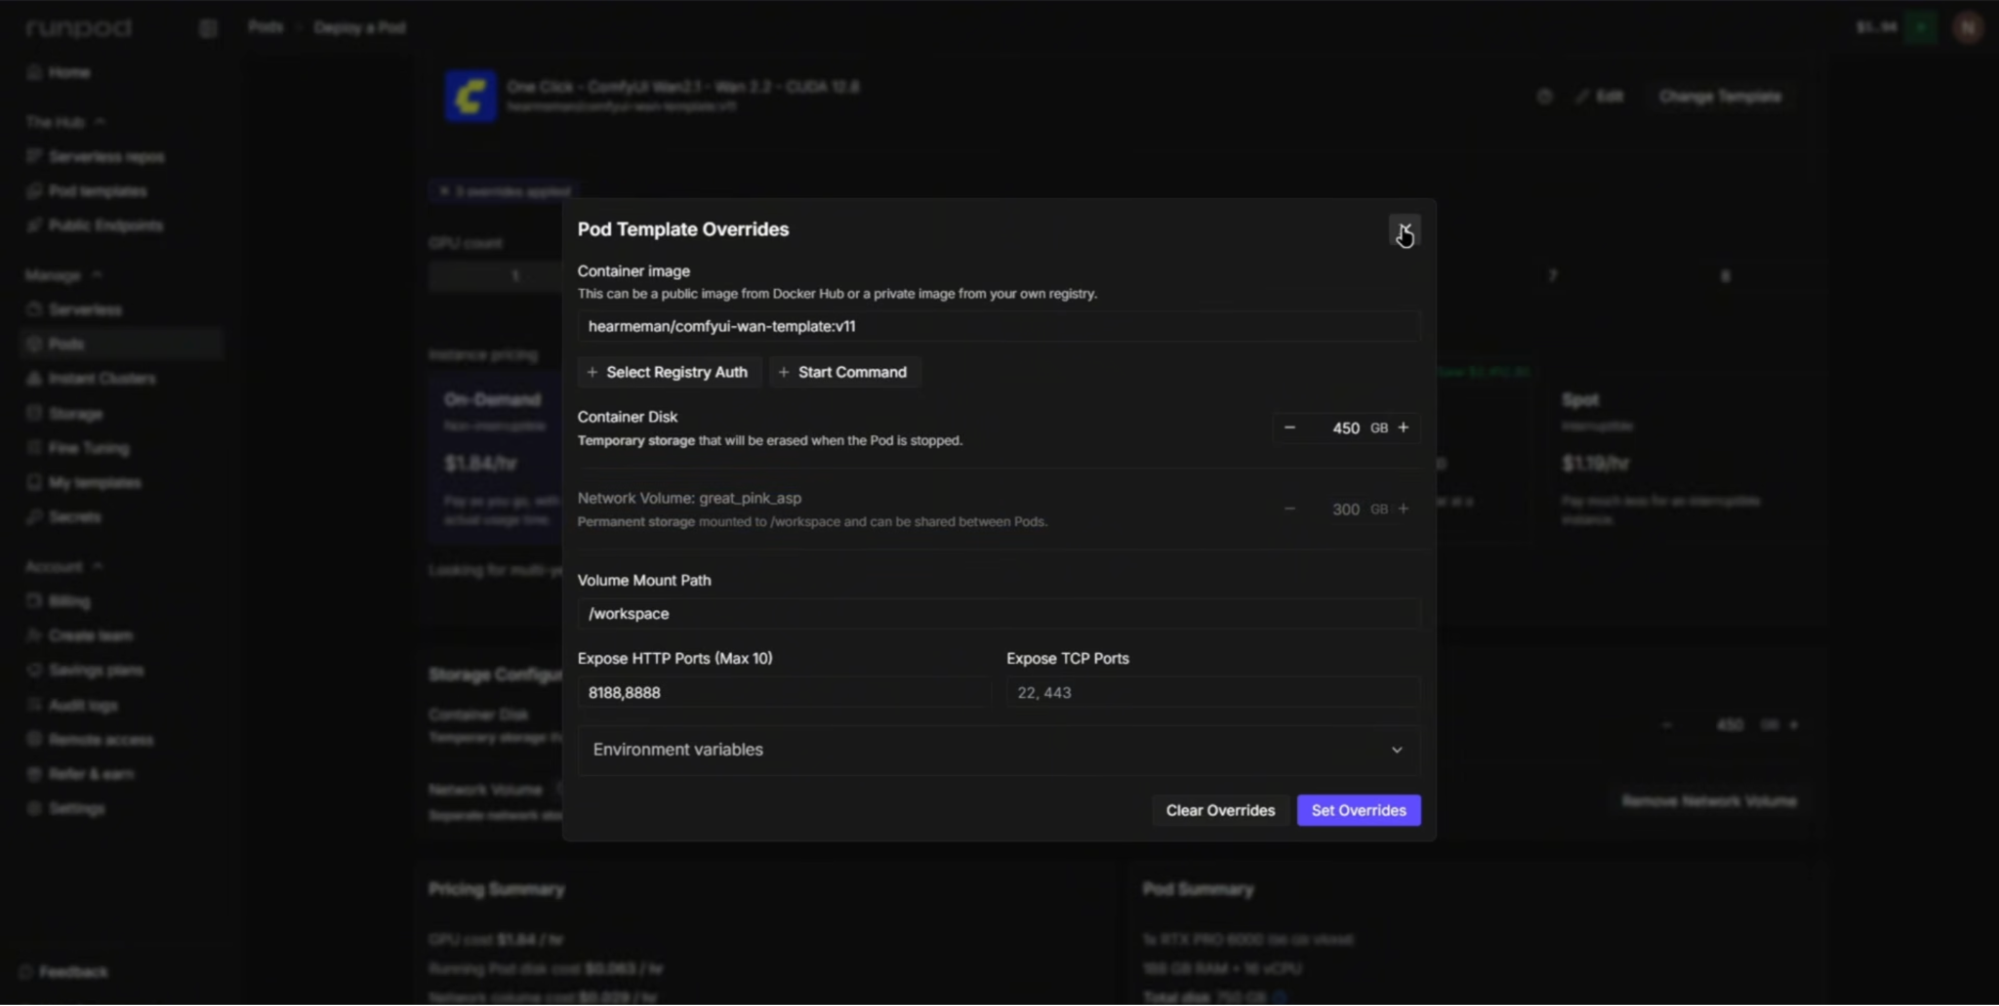
Save configuration changes via Set Overrides.
-
Verify that your 300 GB network storage volume is correctly mounted, then click Deploy on Demand.
-
Allow 8 to 10 minutes for server initialization and library deployment.
Step 3. Uploading LoRA Weights via JupyterLab
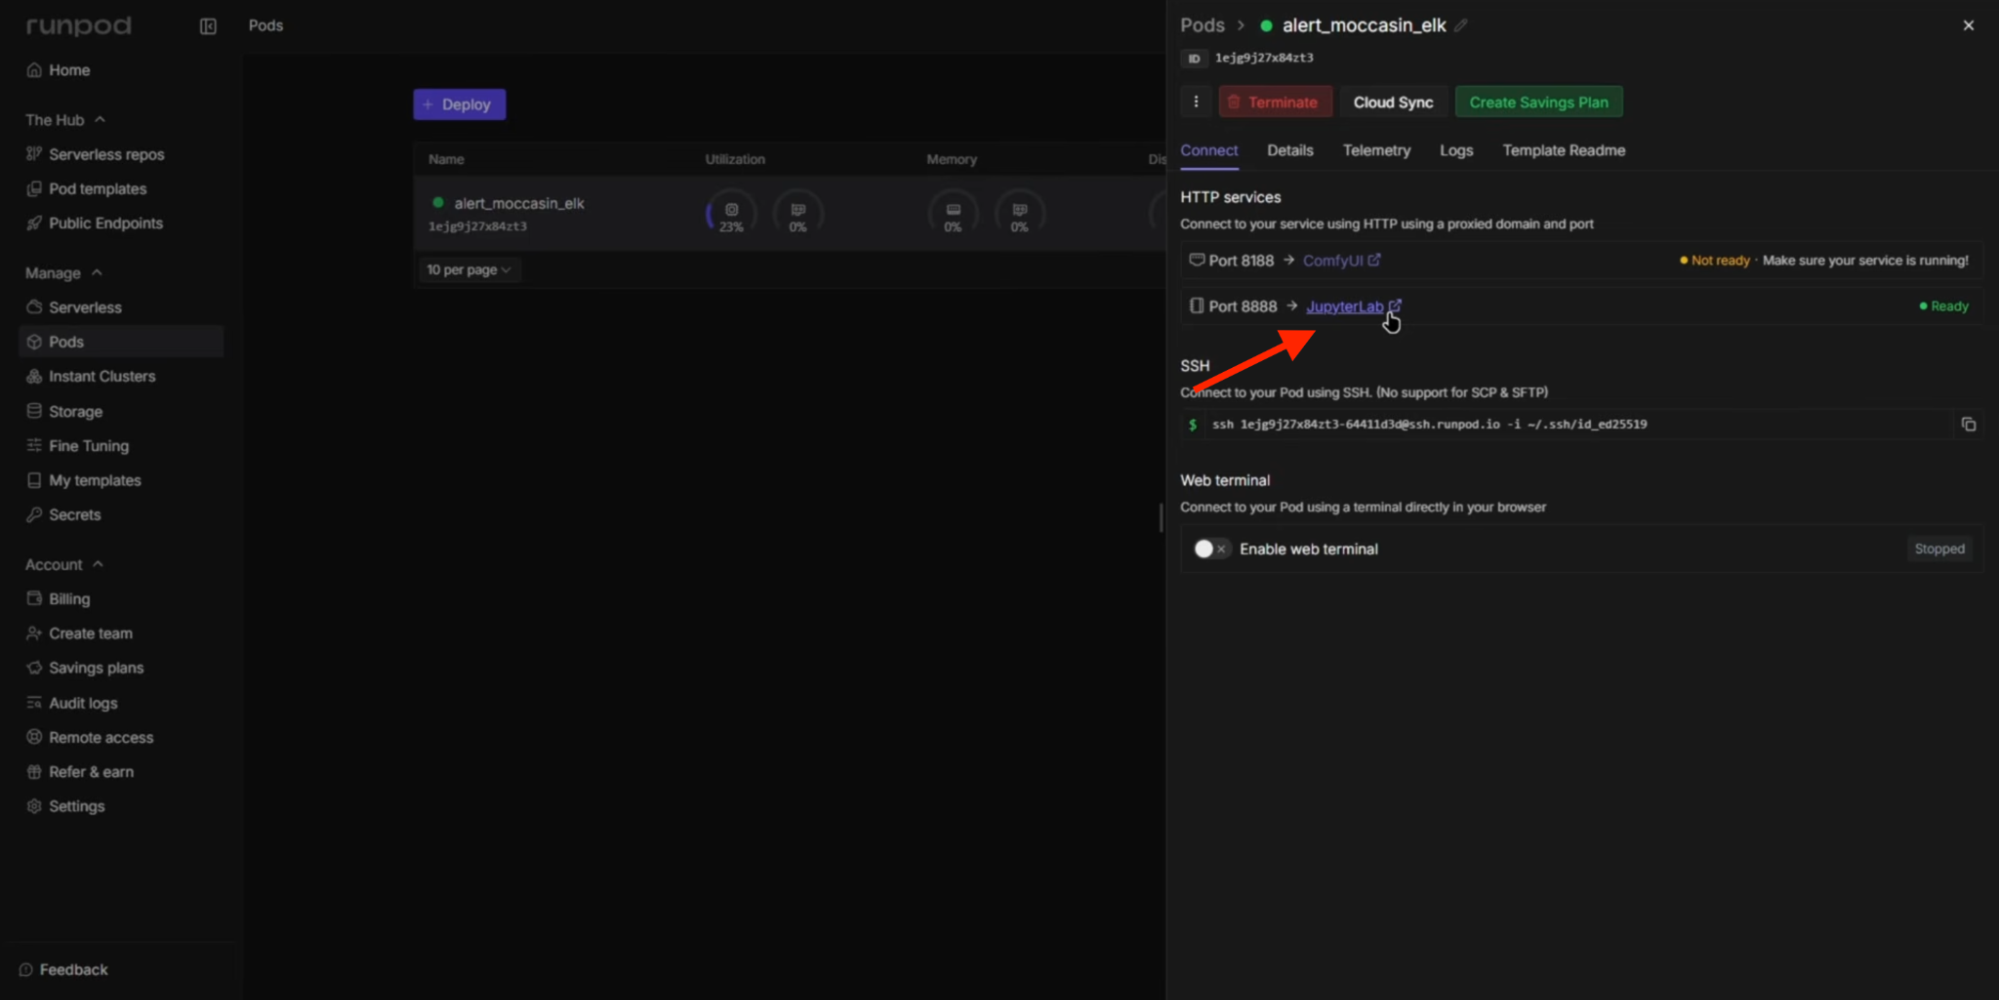
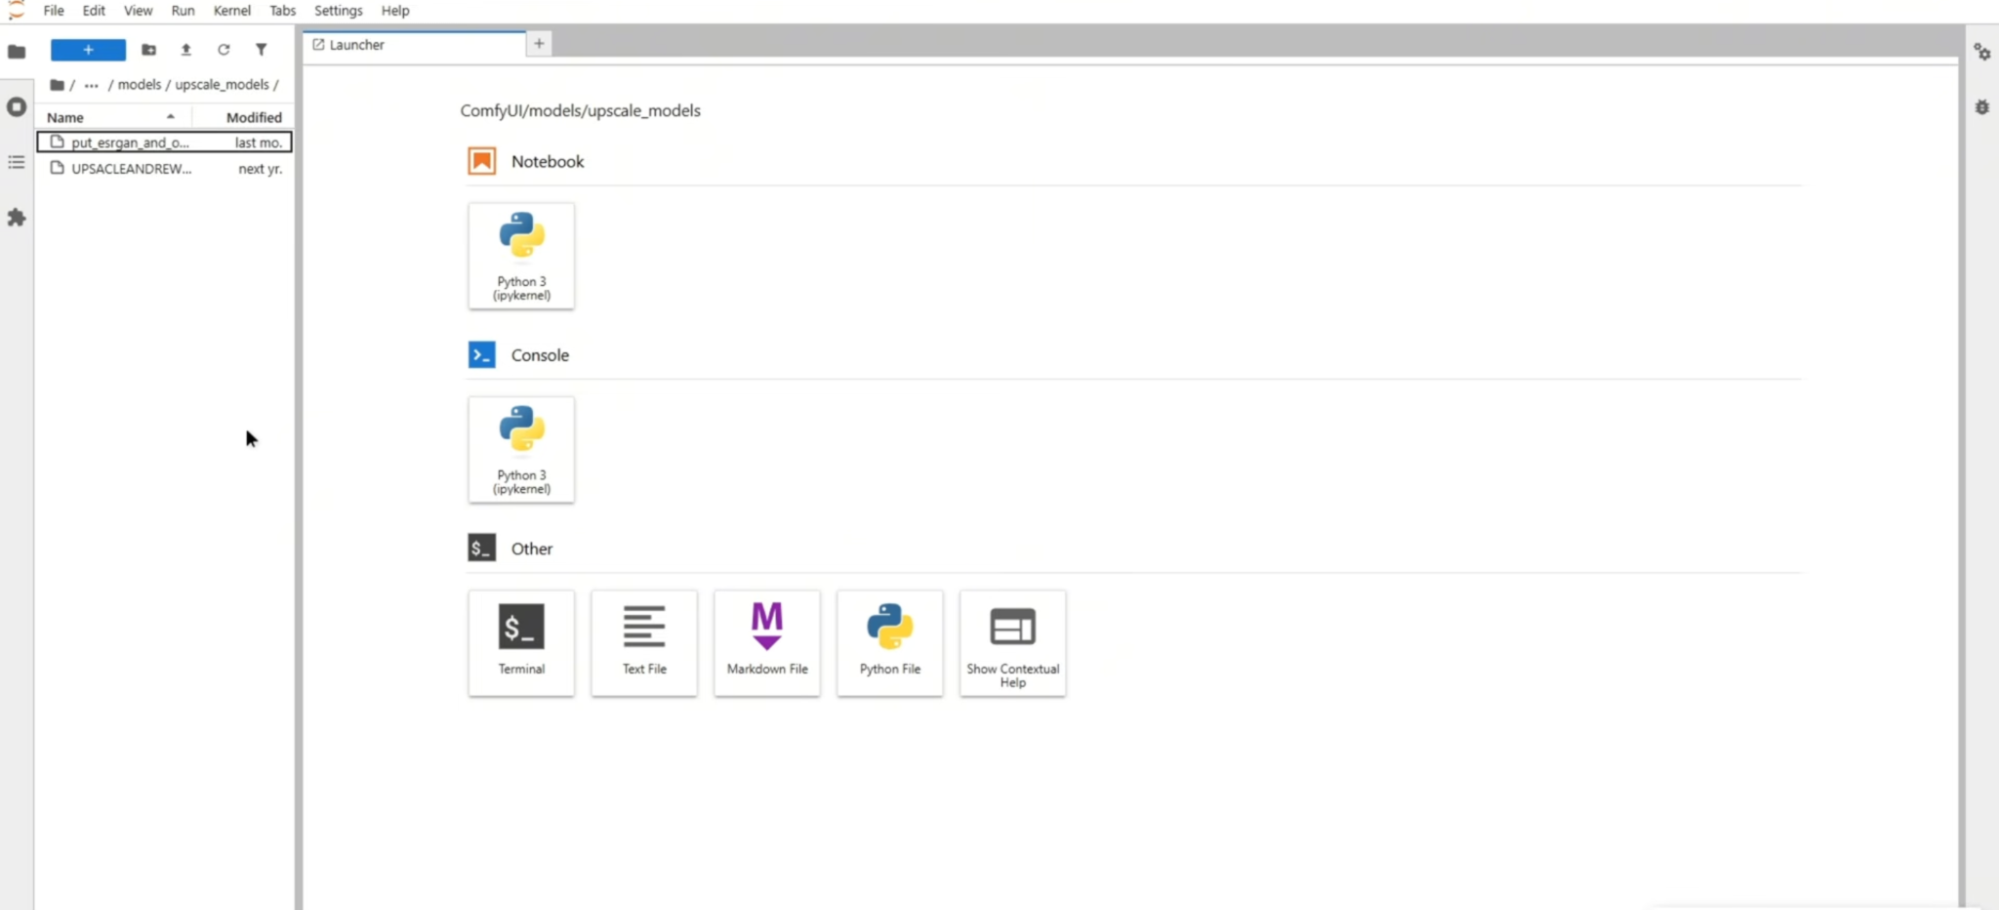
Transfer your custom trained LoRA file to your RunPod instance via JupyterLab, an integrated browser file manager.
-
Click Connect on your active Pod card and select Connect to JupyterLab.
-
In the file browser, navigate to: ComfyUI / models / loras.
-
Click the Upload button (up-arrow icon) or drag your .safetensors file directly into the target directory.
-
Wait for file transfer to finish.
Step 4. Accessing ComfyUI and Importing Workflows
ComfyUI utilizes a visual node graph instead of a simple text box interface. Each stage of the generation process (checkpoint loading, LoRA integration, prompt evaluation, sampling, and video rendering) functions as an interconnected node block within a unified visual pipeline.
To bypass manual node configuration, creators import pre-built JSON workflows containing optimized resolutions, sampler steps, and pre-wired connections.
Dragging a .json file directly into the editor interface auto-loads the complete operational graph. You can download ready-made image and video workflows here.
To import a workflow schema:
-
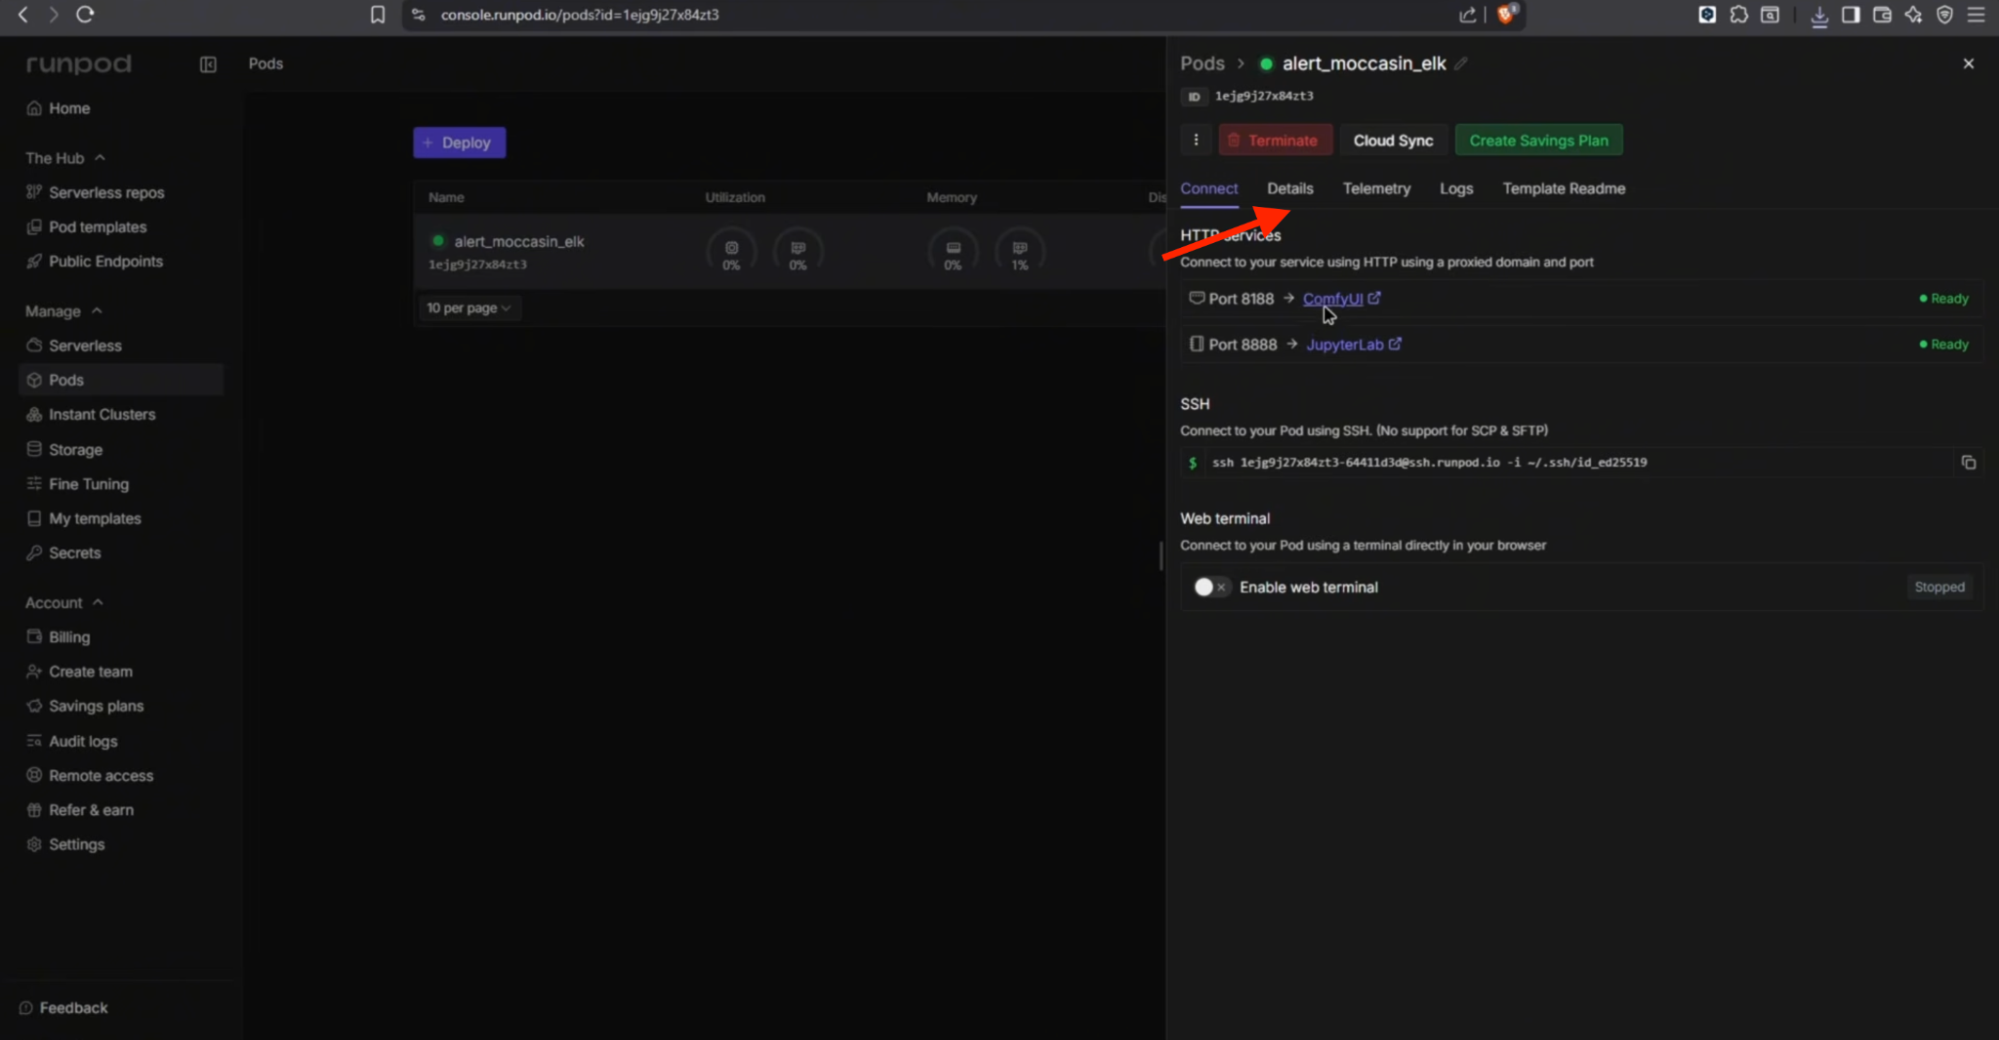
From the RunPod dashboard, click Connect on your Pod and select Connect to ComfyUI Web UI.
-
ComfyUI opens in a new browser tab.
-
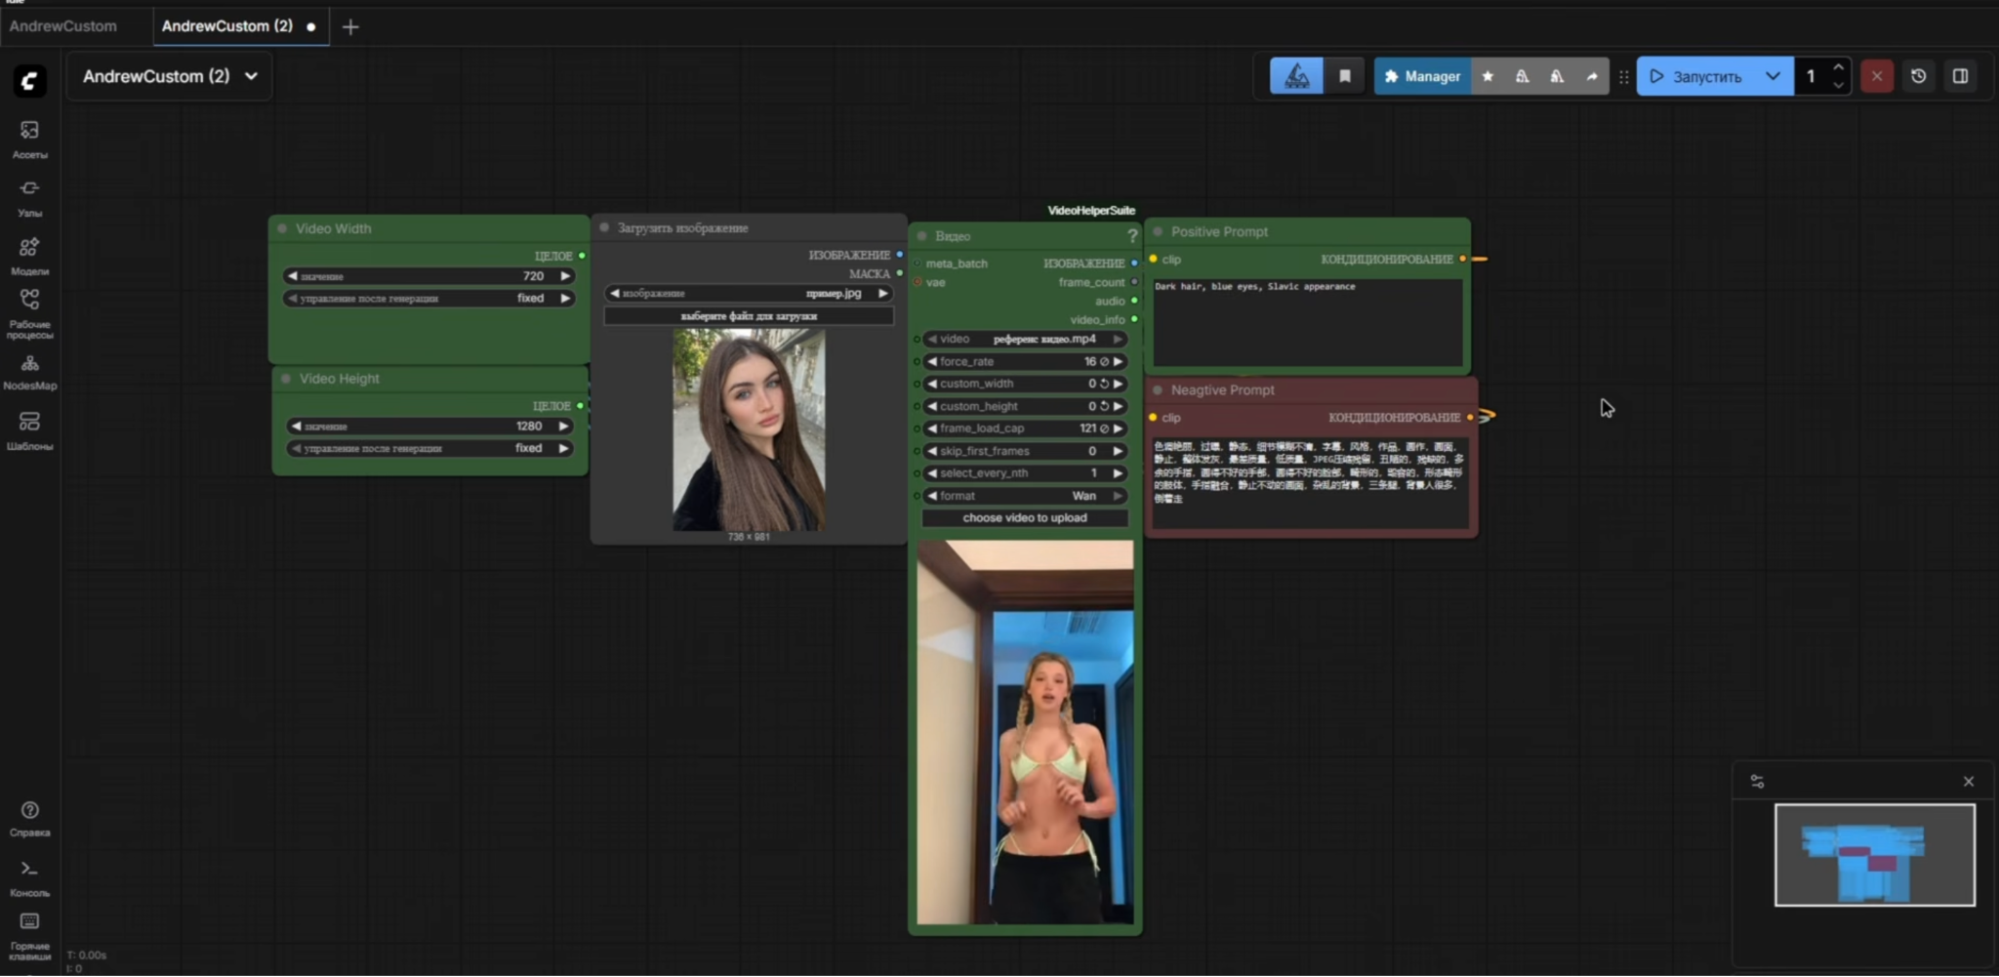
Drag the downloaded workflow.json file directly into the canvas area.
-
The interface auto-assembles the generation nodes.
Step 5. Prompt Setup and Rendering Configure scene parameters within loaded nodes:
-
In the Positive Prompt node, enter your scene description. Begin with your designated Trigger Word, followed by outfit, action, and setting parameters. Avoid descriptors like animated, 3d render, or cartoon to prevent stylized outputs.
-
Keep default settings inside the Negative Prompt node.
-
Upload your model's base portrait into the Load Image node to guide video generation.
-
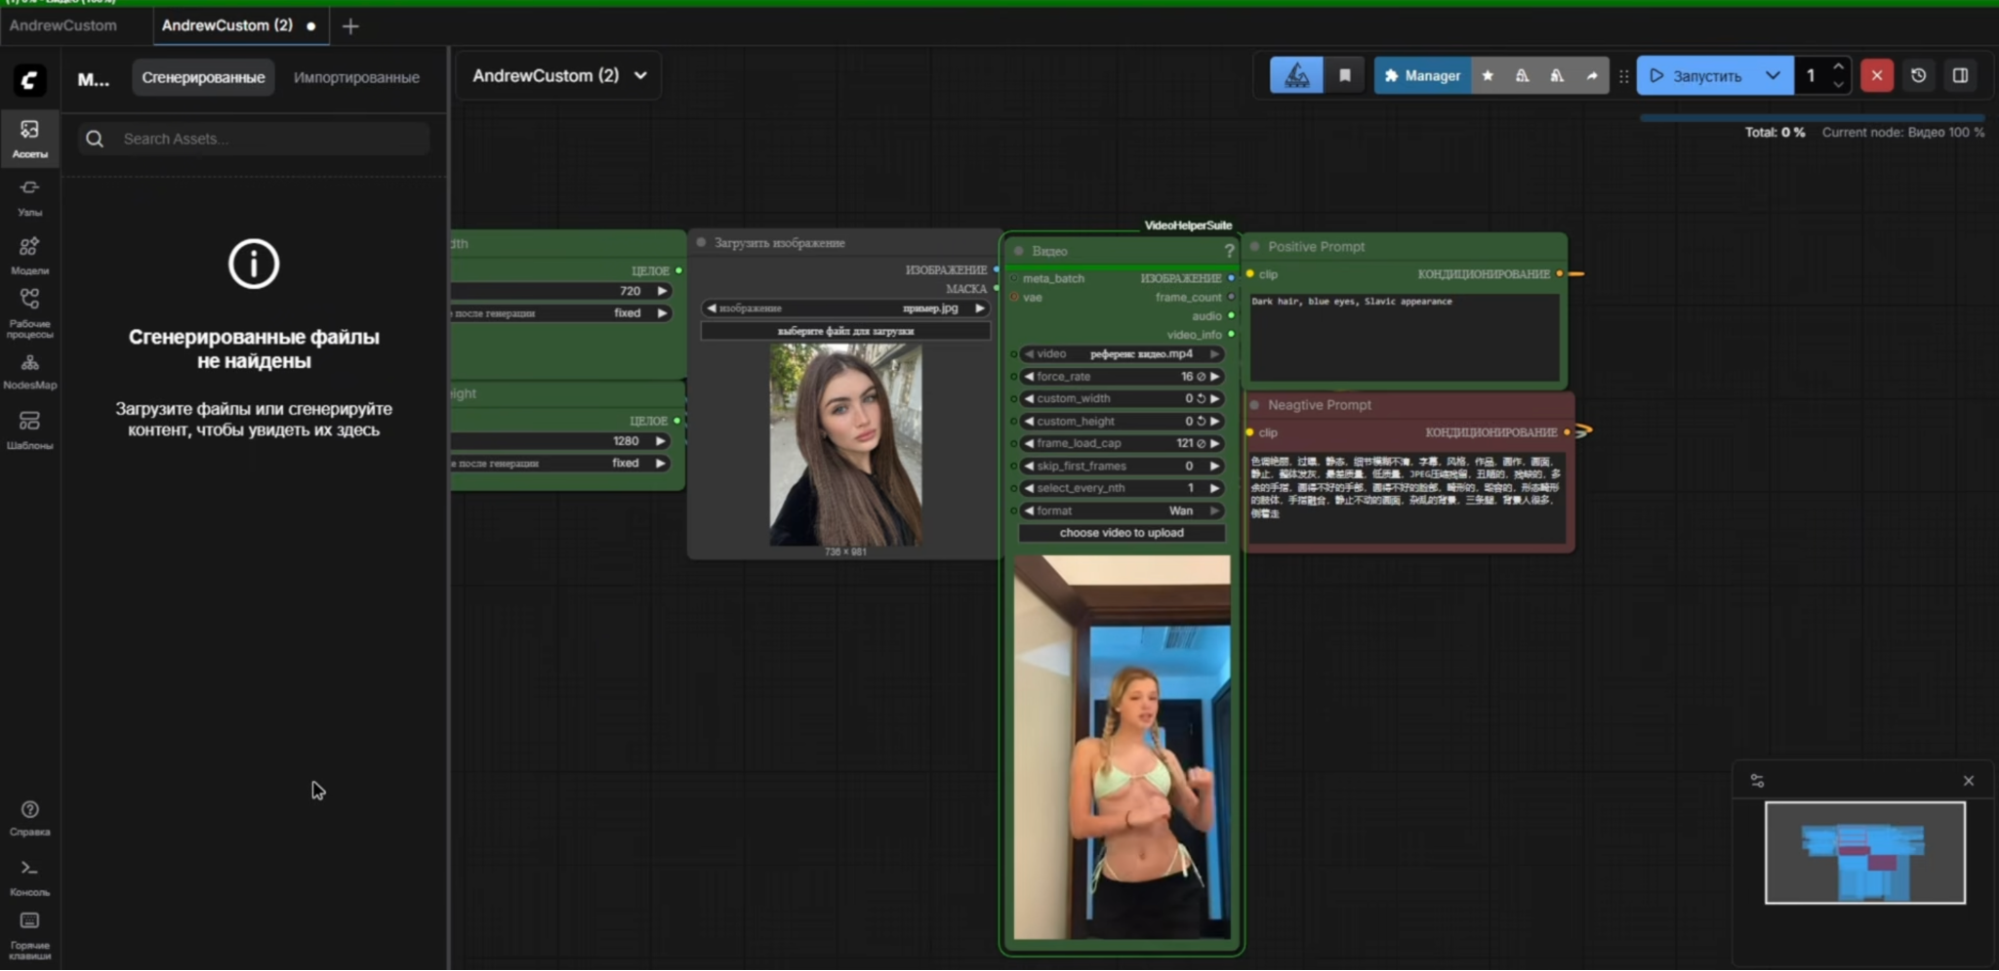
Click Queue Prompt in the control menu to initiate rendering.
Step 6. Exporting Video Renders Rendering a video clip on an RTX Pro 6000 node requires roughly 2 to 5 minutes:
-
Completed takes display directly in the output preview node.
-
Select the final iteration, which delivers the highest frame rate and visual stability.
-
Download video outputs to your computer or access them directly via the ComfyUI / output directory on your server volume.
Advanced Workflows: Video-to-Video Character Replacement
Basic text-to-video workflows help establish foundational ComfyUI mechanics. However, generating content at scale requires advanced methodologies.
Relying solely on single static image inputs for complex motion (walking, athletic movement, clothing try-ons) introduces body distortion and facial drift across frames.
To maintain photorealism in complex scenes, creators employ Video-to-Video pipelines. This technique ingests a source video featuring desired motion dynamics and replaces the original subject with your AI model.
Background elements, lighting, and camera angles persist from the source clip, while face, body, and clothing map to your model's profile. You can download advanced video-to-video workflows here.
Advanced Workflow Components
Three specific tools maintain facial consistency and motion integrity across video frames.
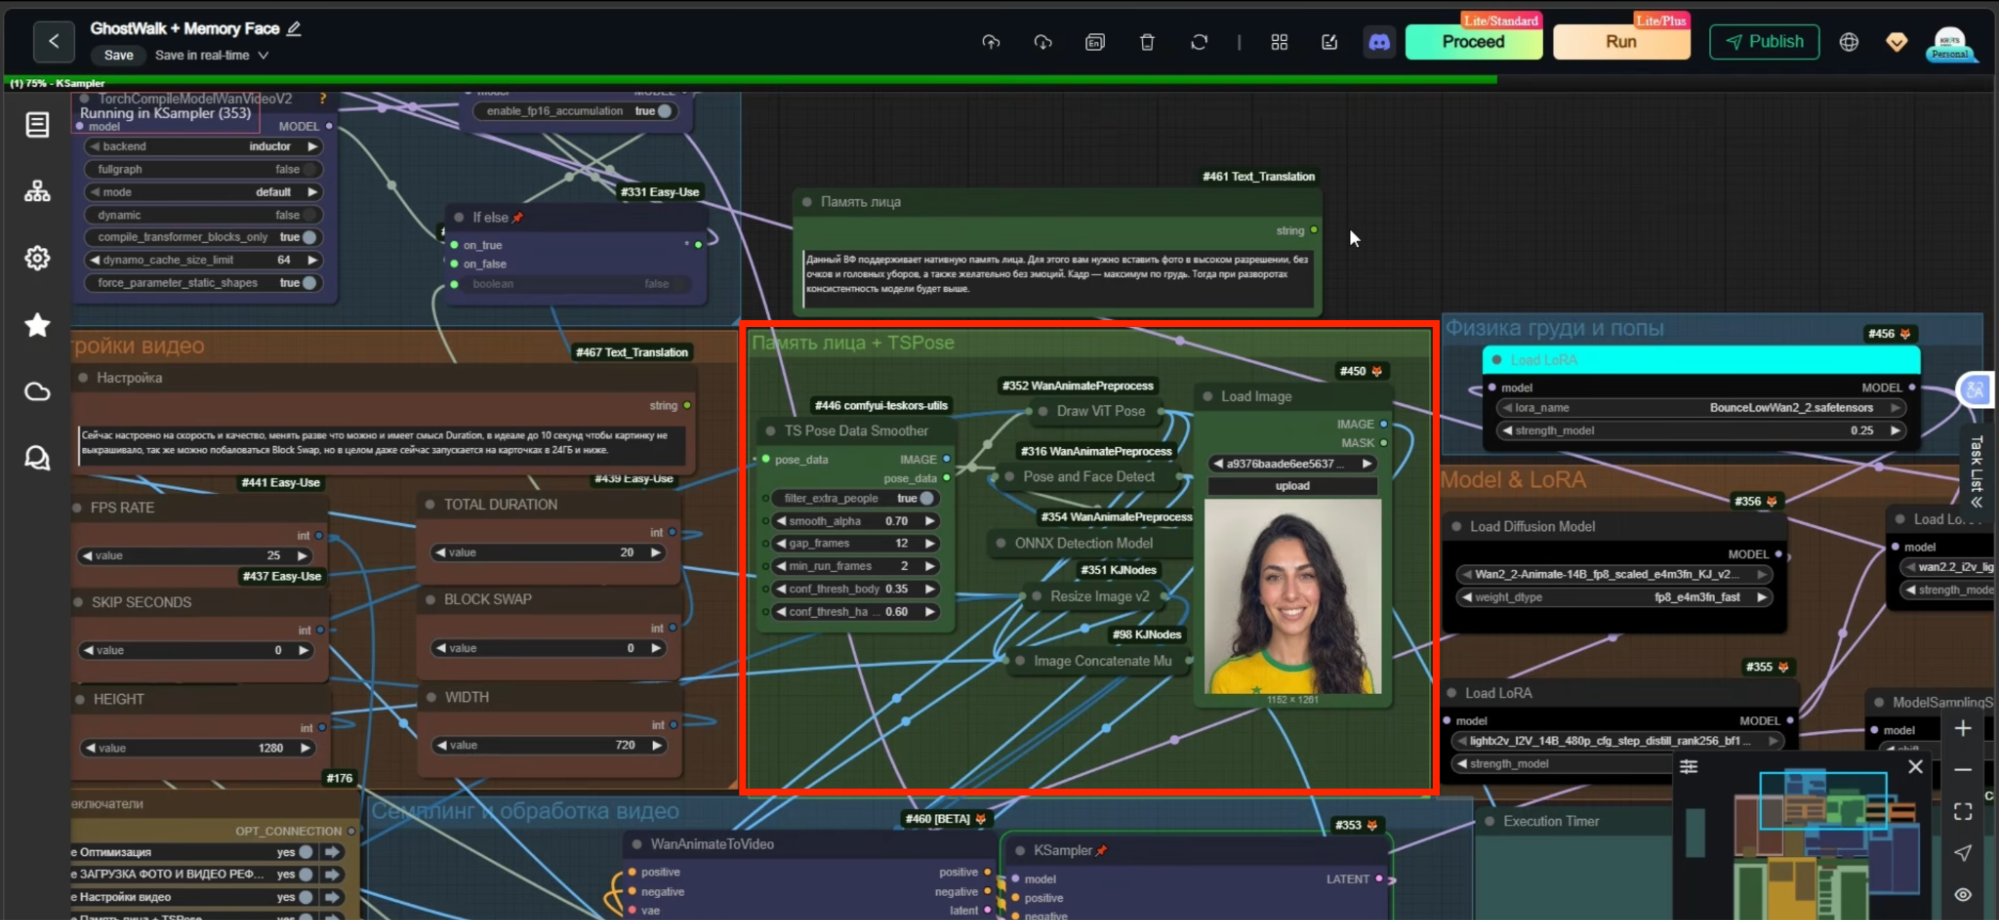
Face Memory. Ingests a clear portrait of your model (without accessories like glasses or hats). The node maps facial vectors directly onto source video frames, ensuring consistent appearance even during rapid head movements.
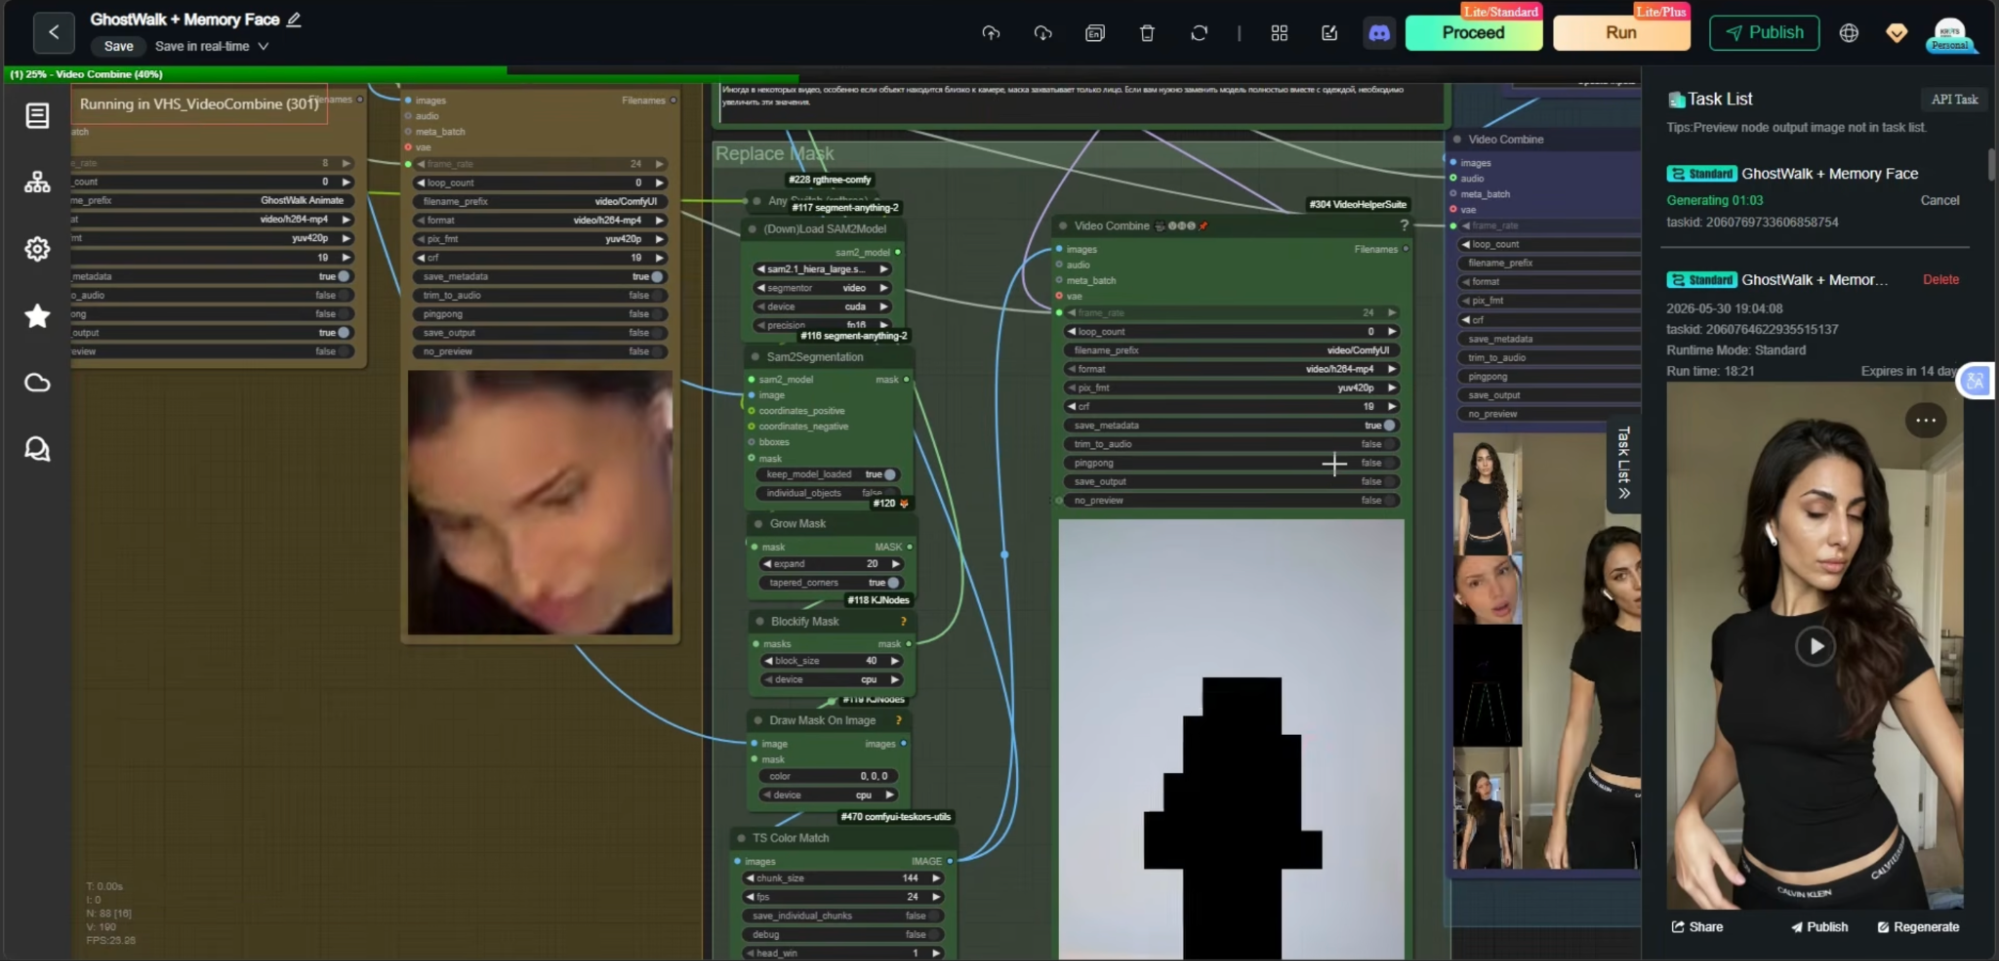
Replace Mask. Generates dynamic masks around the source actor to specify redrawing regions:
-
If the donor actor's physique matches your target model, constrain the mask exclusively to the head region.
-
If replacing clothing or full body proportions, expand the mask over the full silhouette. The system cuts the actor from the frame and renders your AI model while preserving the background environment.
Body Physics. Regulates physical motion dynamics during movement (e.g., walking or running). Maintain slider parameters between 0.25 and 0.5; higher values introduce unnatural distortion.
While advanced ComfyUI graphs appear complex, operating them simply requires importing pre-configured JSON files and inserting media assets into the labeled input nodes.
If execution errors occur, capture a screenshot of your node graph and query Claude or ChatGPT to identify failing connections or incorrect parameters.
Conclusion
Creating consistent AI models does not require local high-end hardware or coding expertise. Leasing cloud GPU servers via RunPod resolves compute constraints, while pre-built ComfyUI workflows streamline execution without manual node construction.
Final output quality hinges primarily on dataset preparation. Curating 35–40 high-quality images paired with clean text captions ensures your trained LoRA renders consistent facial features across any scene. Leveraging Video-to-Video workflows with donor clips enables scalable production of realistic short-form video content for social platforms.